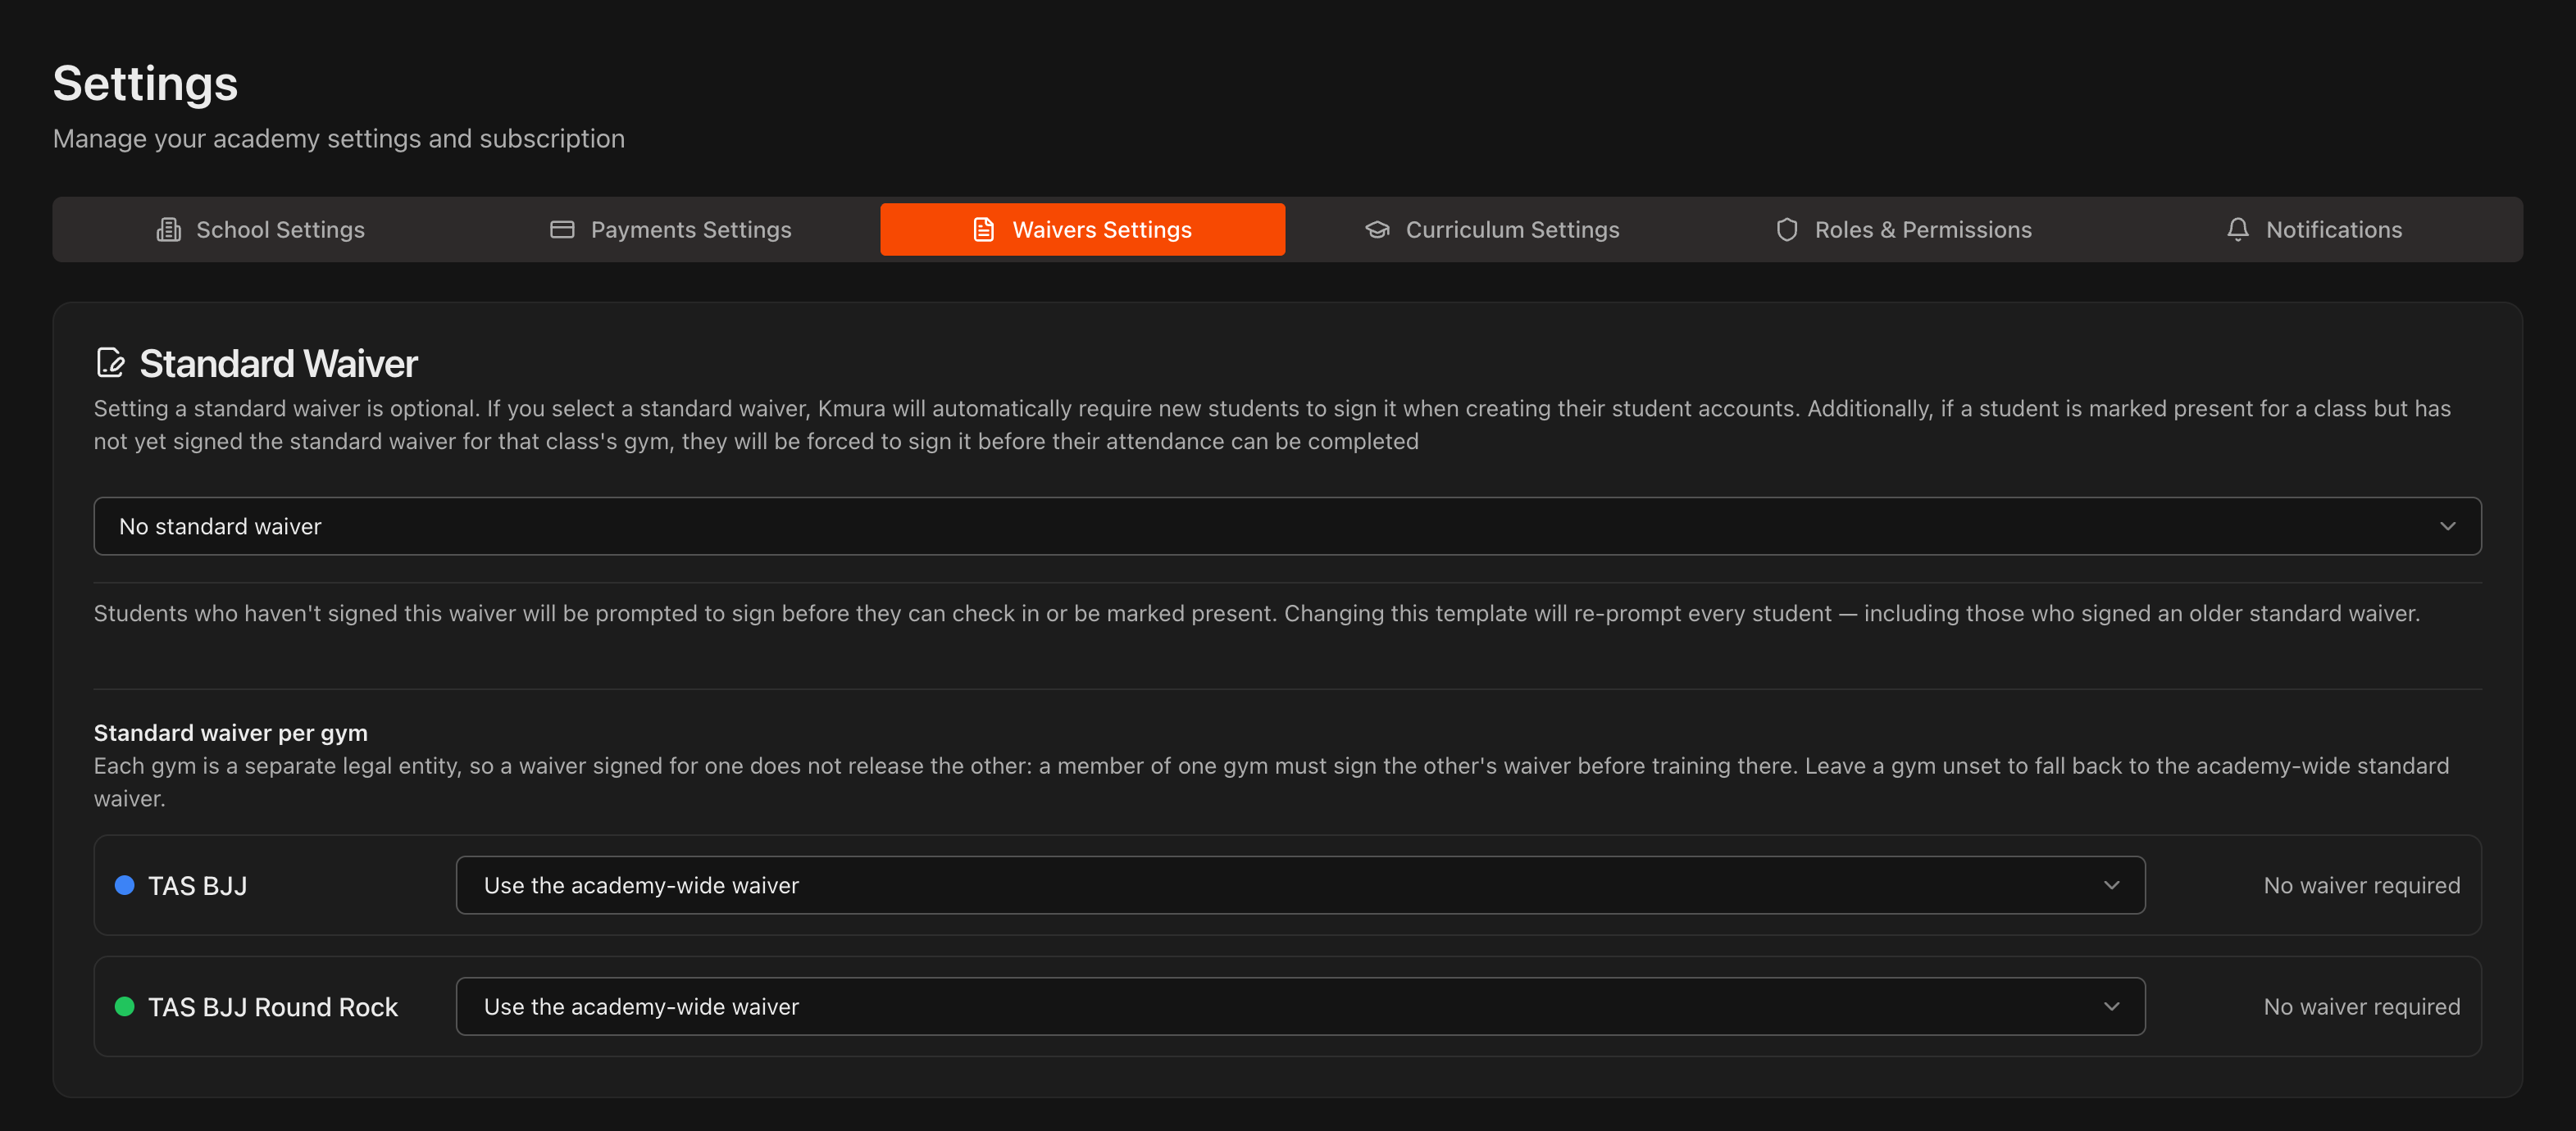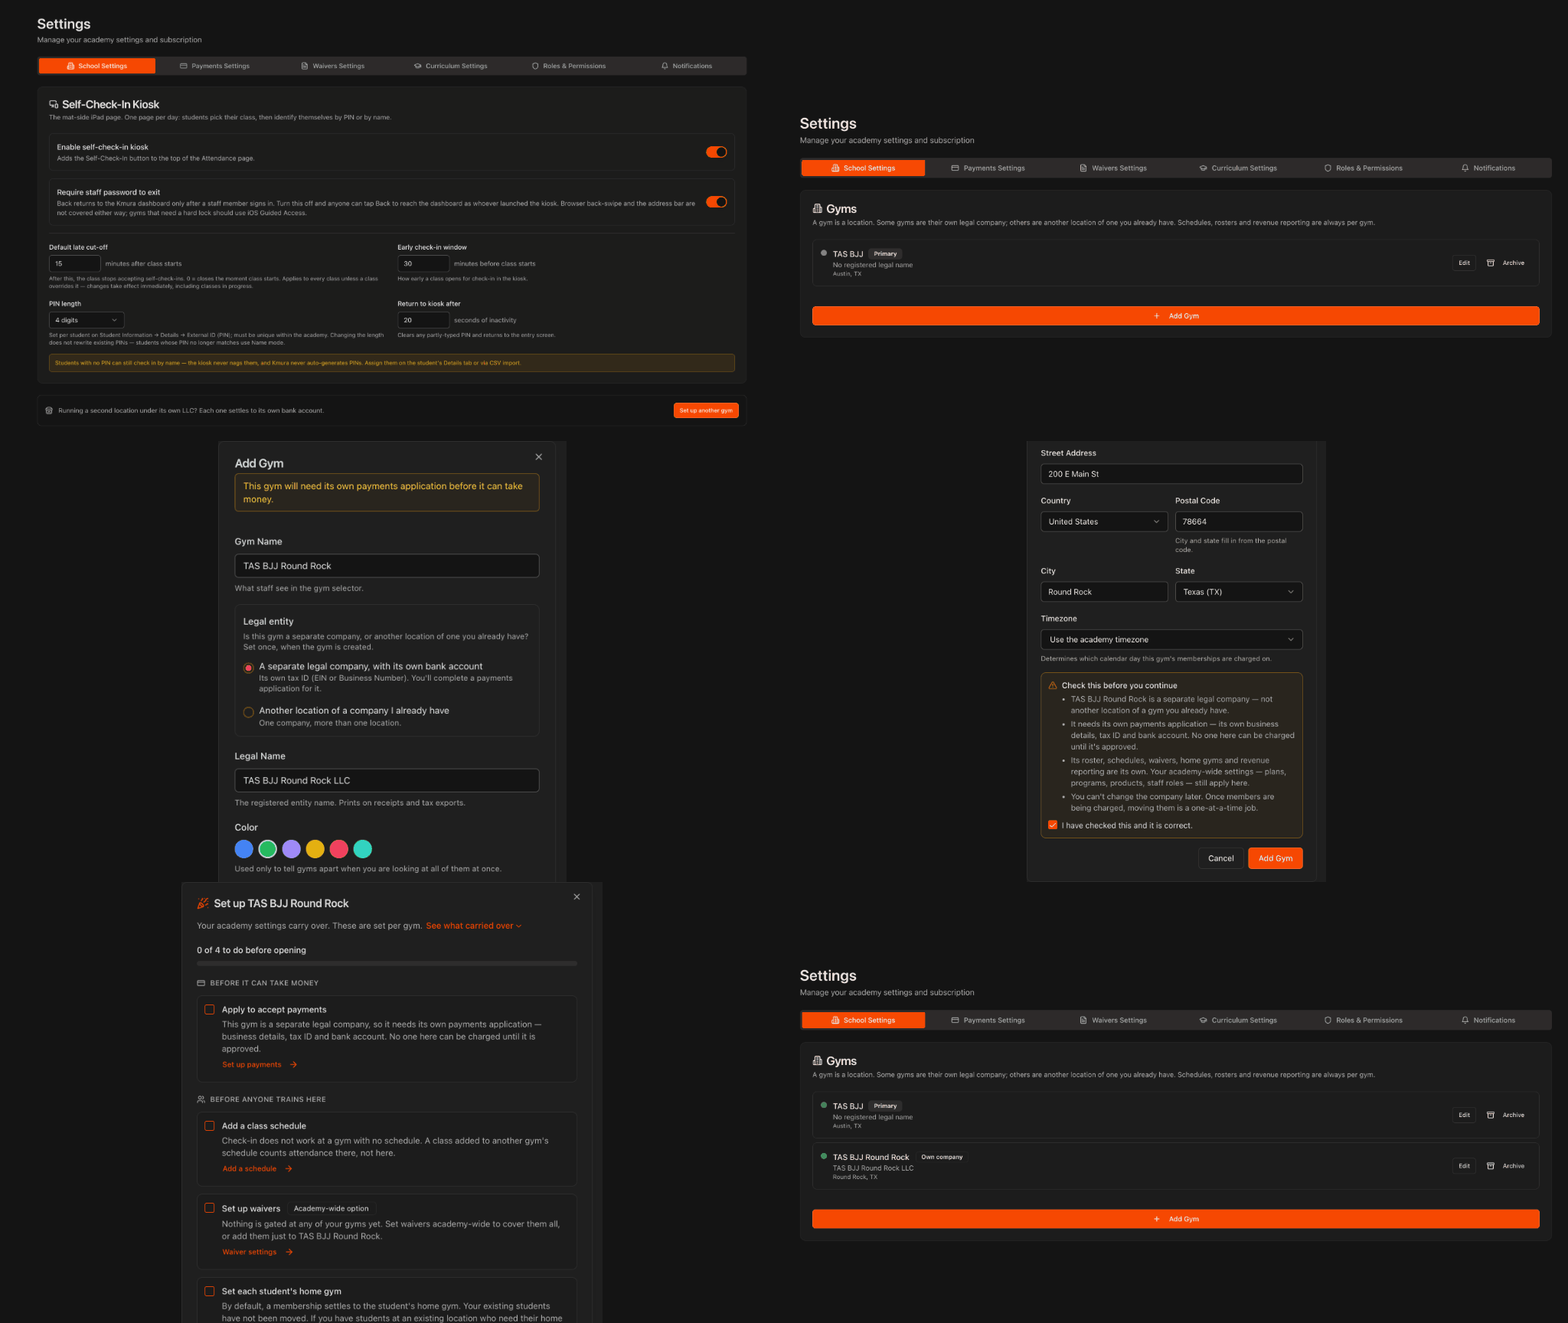
Open the Gyms section in School Settings
Go to Settings, open the School Settings tab, and scroll to the bottom of the page.
On the card that asks whether you are running a second location under its own LLC, click Set up another gym. The Gyms section appears at the top of the tab and lists every gym on your account, with your original gym marked Primary.
Click Add Gym.
Note
In Kmura a gym is a location. Schedules, rosters, waivers and revenue reporting are always per gym. Membership plans, programs, products and staff roles stay shared across your whole academy.
Note
Each additional location adds $150/month to your Kmura subscription, so a gym with two locations pays $300/month. The updated amount shows under **Settings** > **Payments Settings** > **Kmura Plan**.
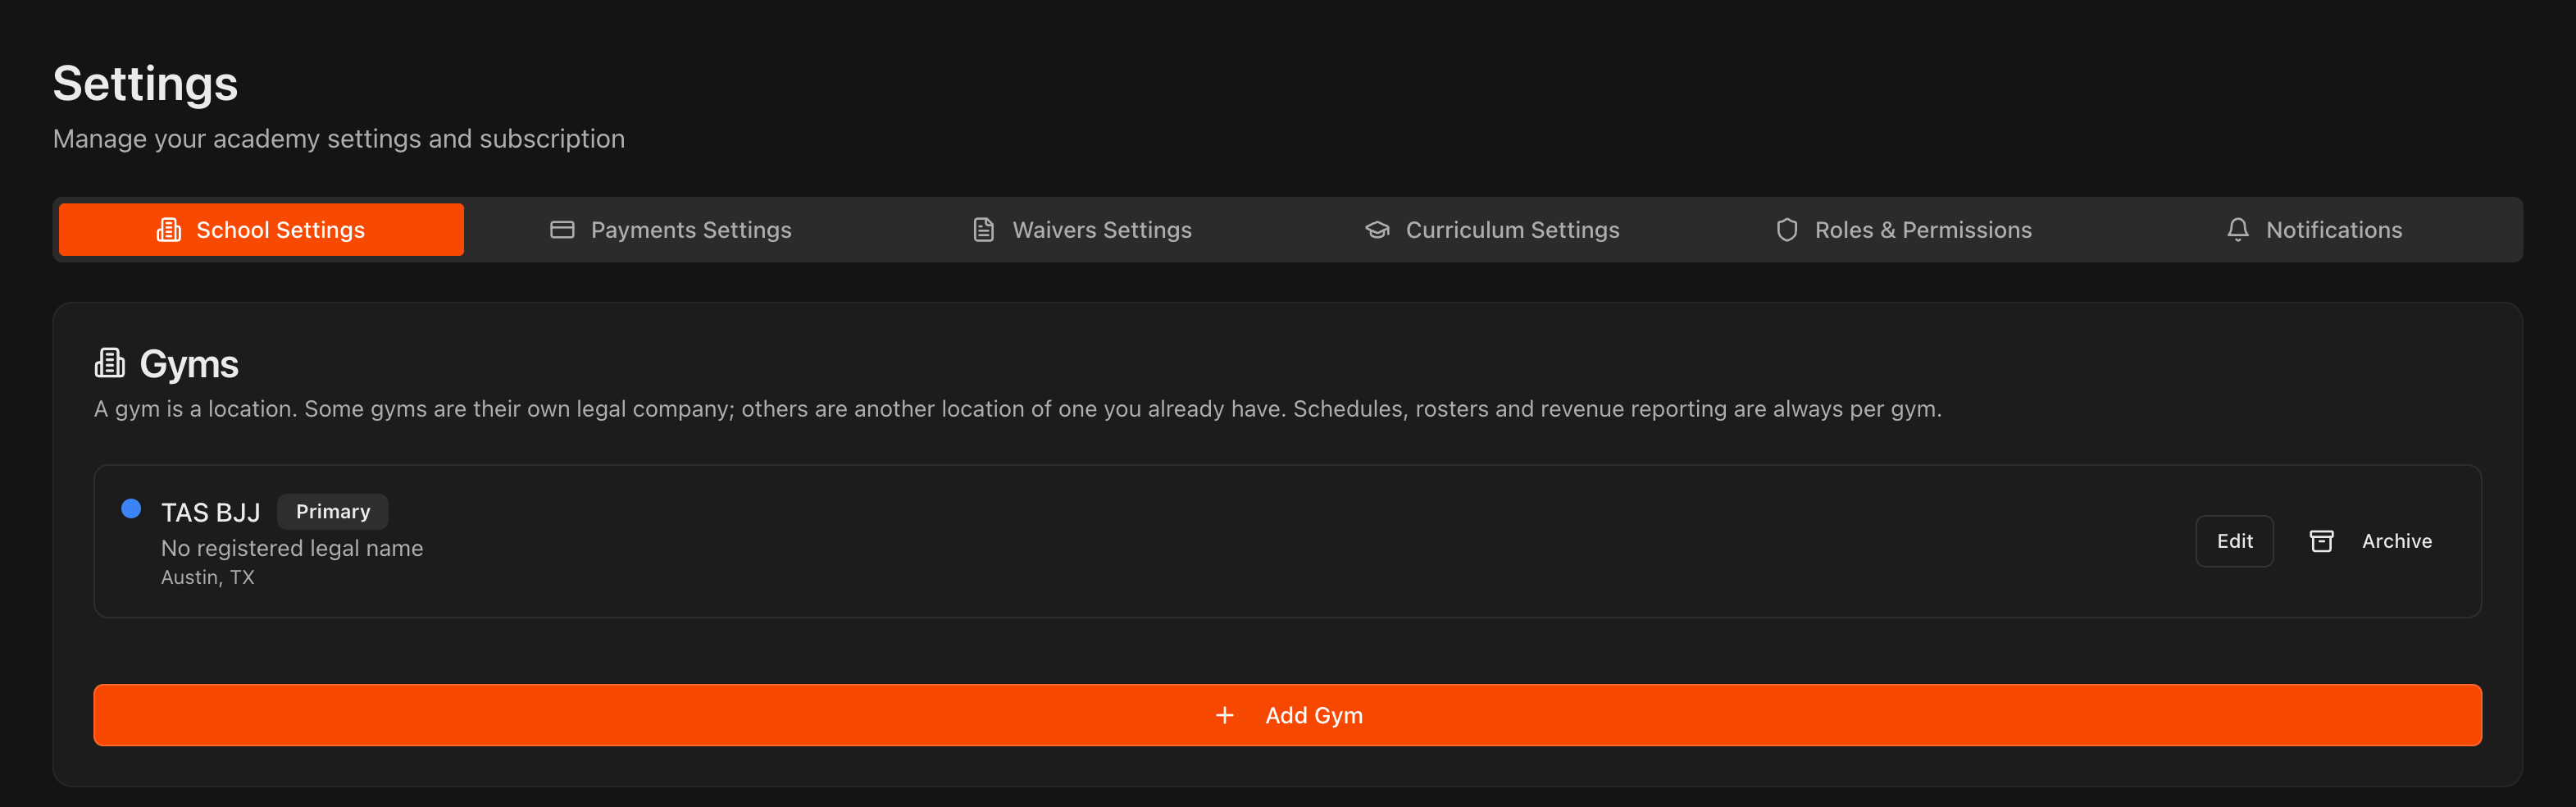
Name the gym and choose its legal entity
In the Add Gym dialog, enter the Gym Name your staff will see in the gym selector, for example TAS BJJ Round Rock.
Under Legal entity, choose A separate legal company, with its own bank account when the location has its own tax ID and bank account. Choose Another location of a company I already have when it belongs to a company already on your account, then pick that company under Which one?.
Enter the Legal Name, the registered entity name that prints on receipts and tax exports, and pick a Color so you can tell this gym apart when looking at all of them at once.
Caution
The legal entity choice is set once, when the gym is created, and cannot be changed later. A separate legal company must complete its own payments application before anyone can be charged there. Another location of an existing company settles through that company's account, so there is no extra application.
Add the address and timezone, then confirm
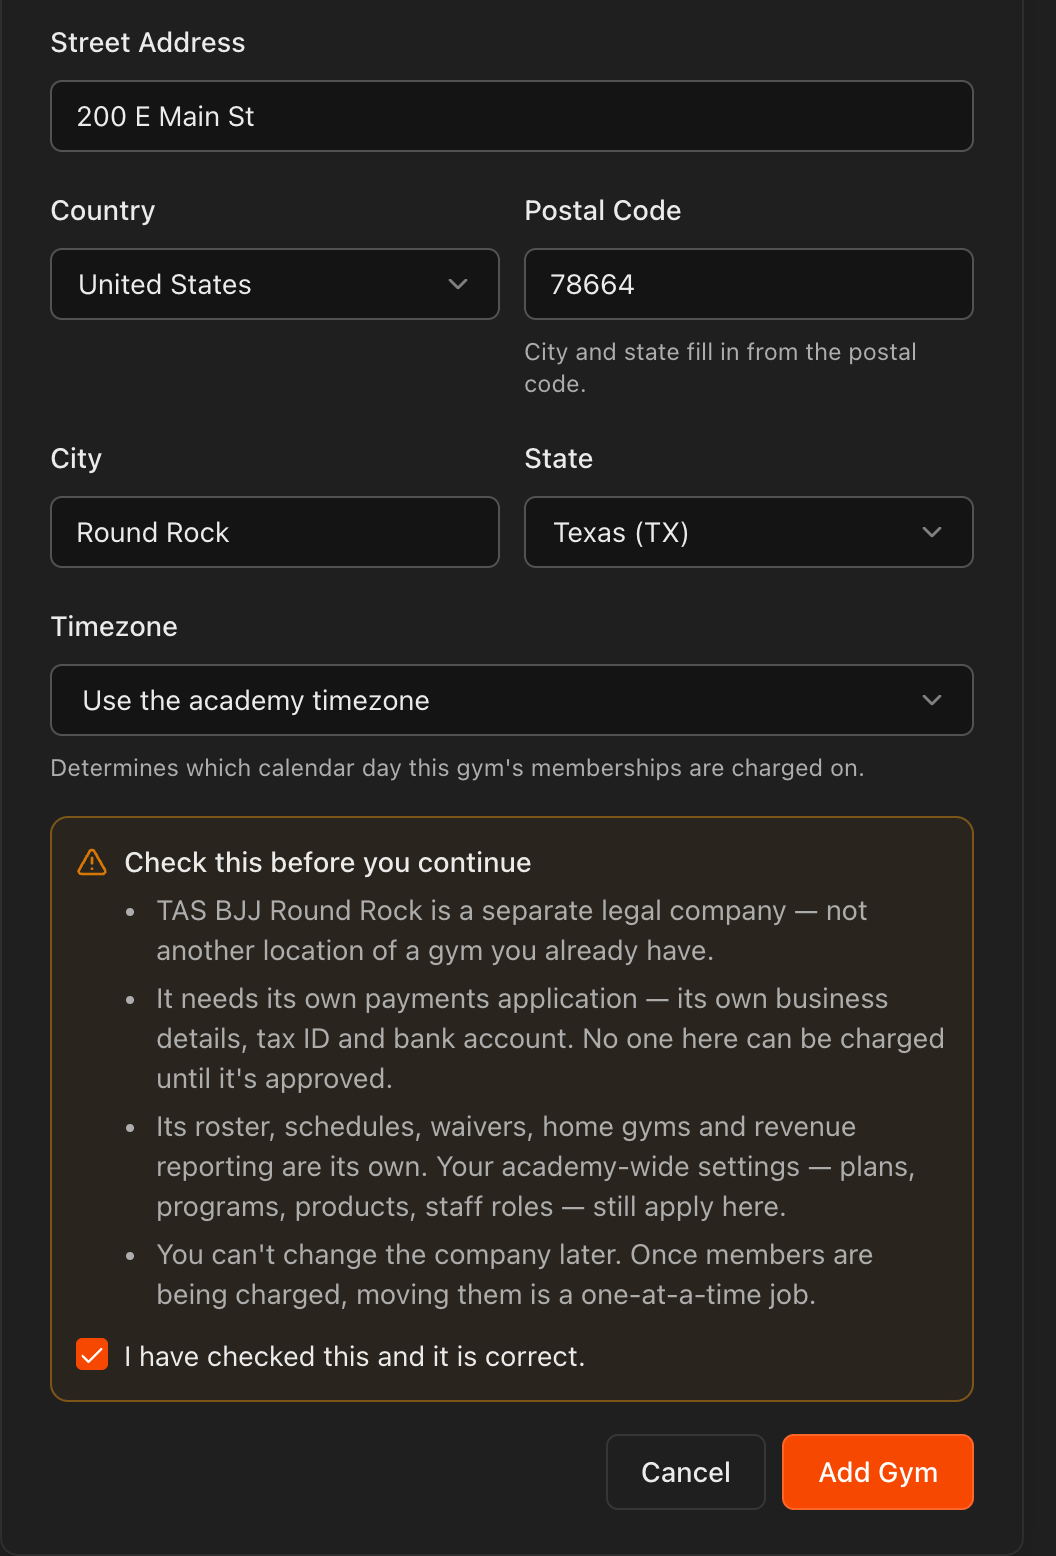
Enter the Street Address, Country and Postal Code. City and State fill in from the postal code.
Leave Timezone on Use the academy timezone, or pick the gym's own. It decides which calendar day this gym's memberships are charged on.
Read the Check this before you continue summary, tick I have checked this and it is correct, and click Add Gym.
Tip
The summary repeats what your choice means: its own payments application, roster, schedules, waivers, home gyms and revenue reporting, while academy-wide settings still apply. If anything looks wrong, click **Cancel** and change the legal entity before creating the gym.
Work through the new gym's setup checklist
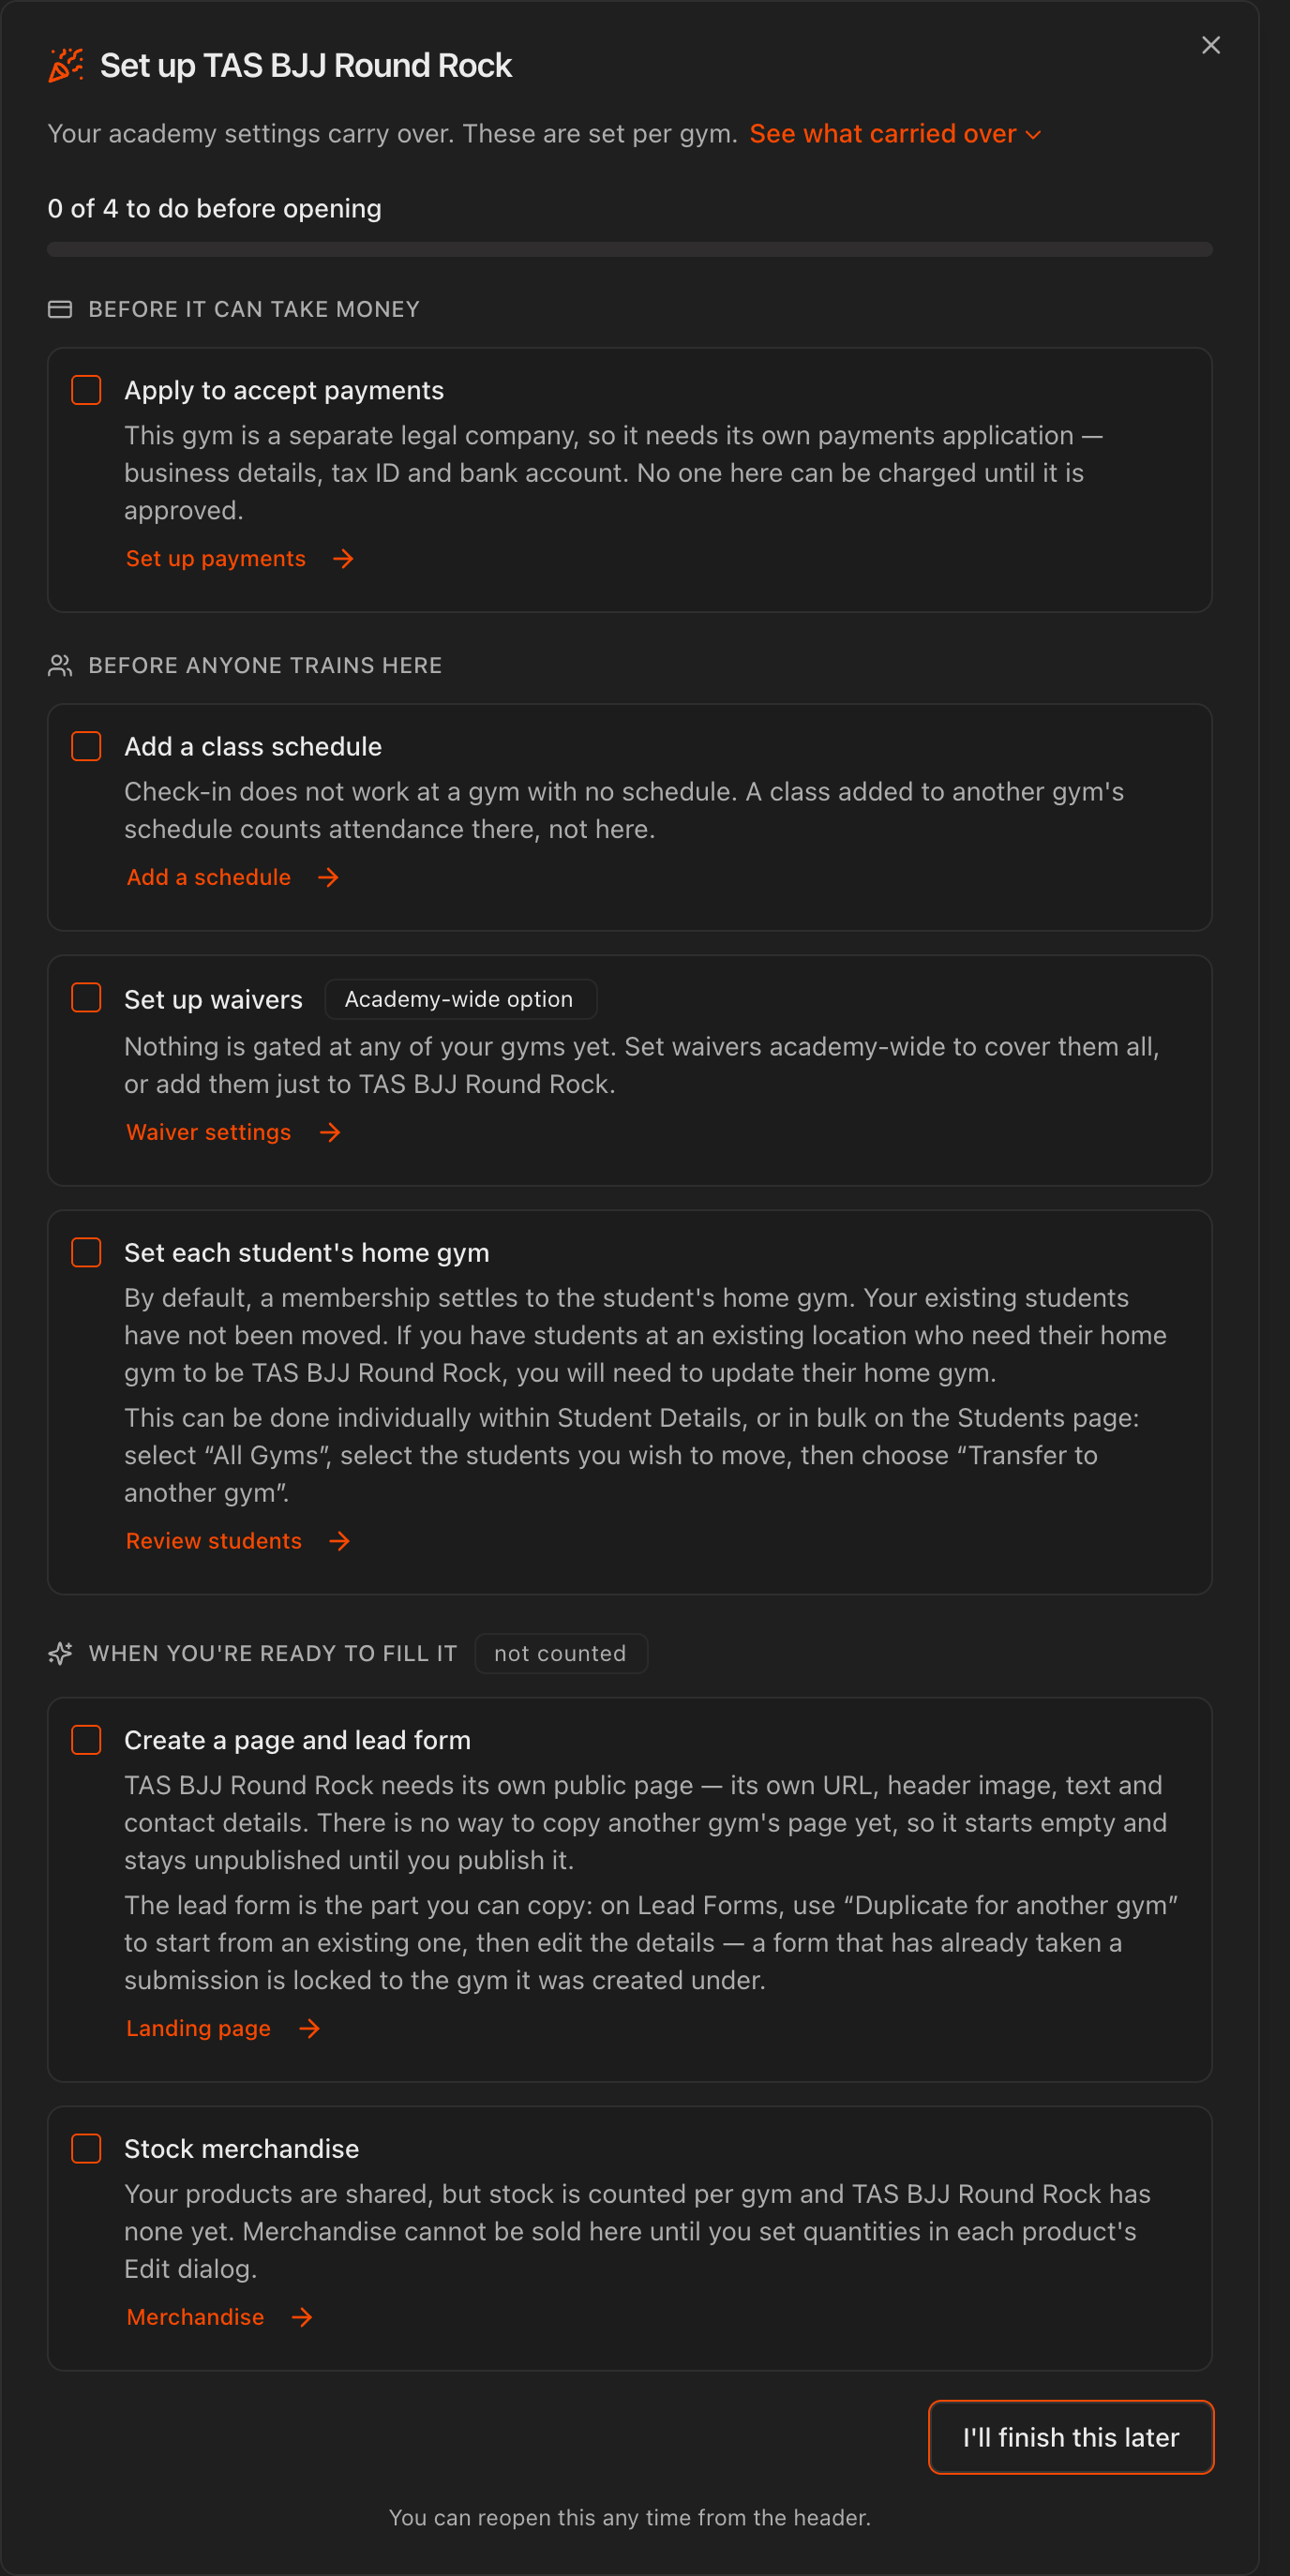
As soon as the gym is created, Kmura opens Set up [gym name], a checklist of everything the new gym still needs. The same list is emailed to you.
Before it can take money: Apply to accept payments. Before anyone trains here: Add a class schedule, Set up waivers and Set each student's home gym. Each item links straight to the right page.
When you're ready to fill it holds the optional items: Create a page and lead form and Stock merchandise.
Click I'll finish this later to close it. A Finish setting up [gym name] button stays in the header, with the number of open items, until the required items are done.
Note
The counter at the top of the checklist only tracks the required items. Your existing gym keeps working as before while you finish the new one.
Know what is shared and what is set per gym
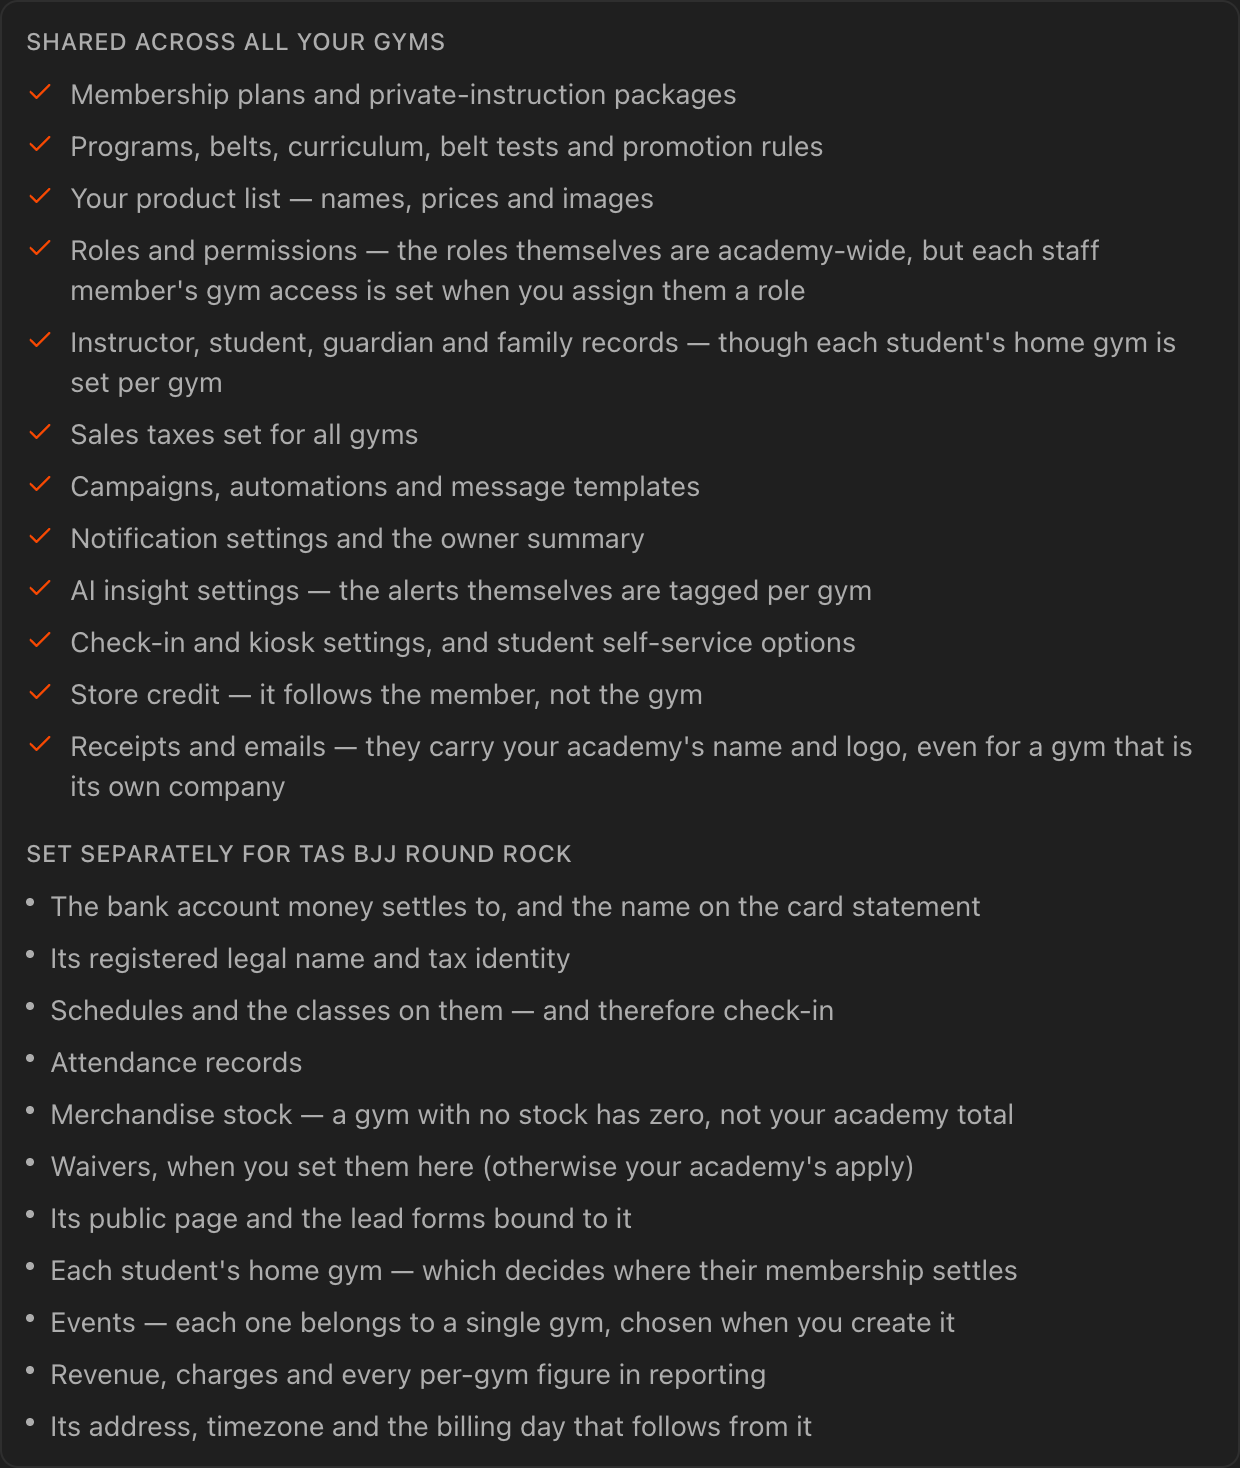
At the top of the checklist, click See what carried over to expand the full list.
Shared across all your gyms: membership plans and private instruction packages; programs, belts, curriculum, belt tests and promotion rules; your product list; roles and permissions; instructor, student, guardian and family records; sales taxes set for all gyms; campaigns, automations and message templates; notification settings; AI insight settings; check-in and kiosk settings; store credit; and your academy name and logo on receipts and emails.
Set separately for the new gym: the bank account money settles to and the name on the card statement; its legal name and tax identity; schedules and classes, and therefore check-in; attendance records; merchandise stock; waivers, when you set them per gym; its public page and lead forms; each student's home gym; events; revenue and every per-gym figure in reporting; and its address, timezone and billing day.
Switch between gyms with the gym selector
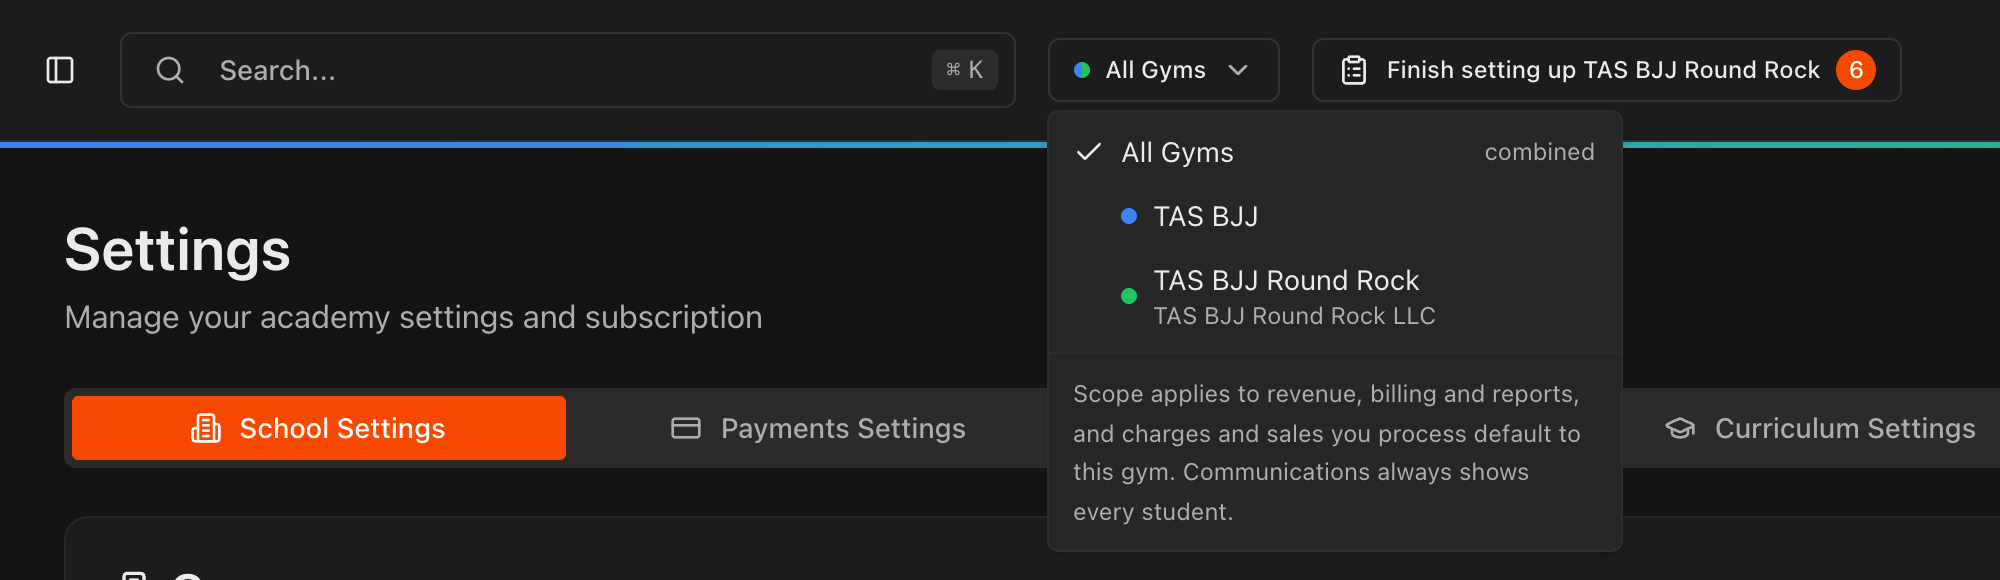
Once you have more than one gym, a gym selector appears in the header next to the search box. All Gyms is a combined view; pick a gym to work inside that one only.
The scope you choose applies to revenue, billing and reports, and any charge or sale you process defaults to that gym. Communications always shows every student in the academy.
Each gym has its own color. That colored dot appears next to gym names on student rows, schedules, charges and alerts so you can see which gym something belongs to.
Tip
Pages like Students, Schedule and Merchandise follow the selector too. If a list looks empty, check that the selector is on **All Gyms** or on the gym you expect.
Complete the payments application for the new gym
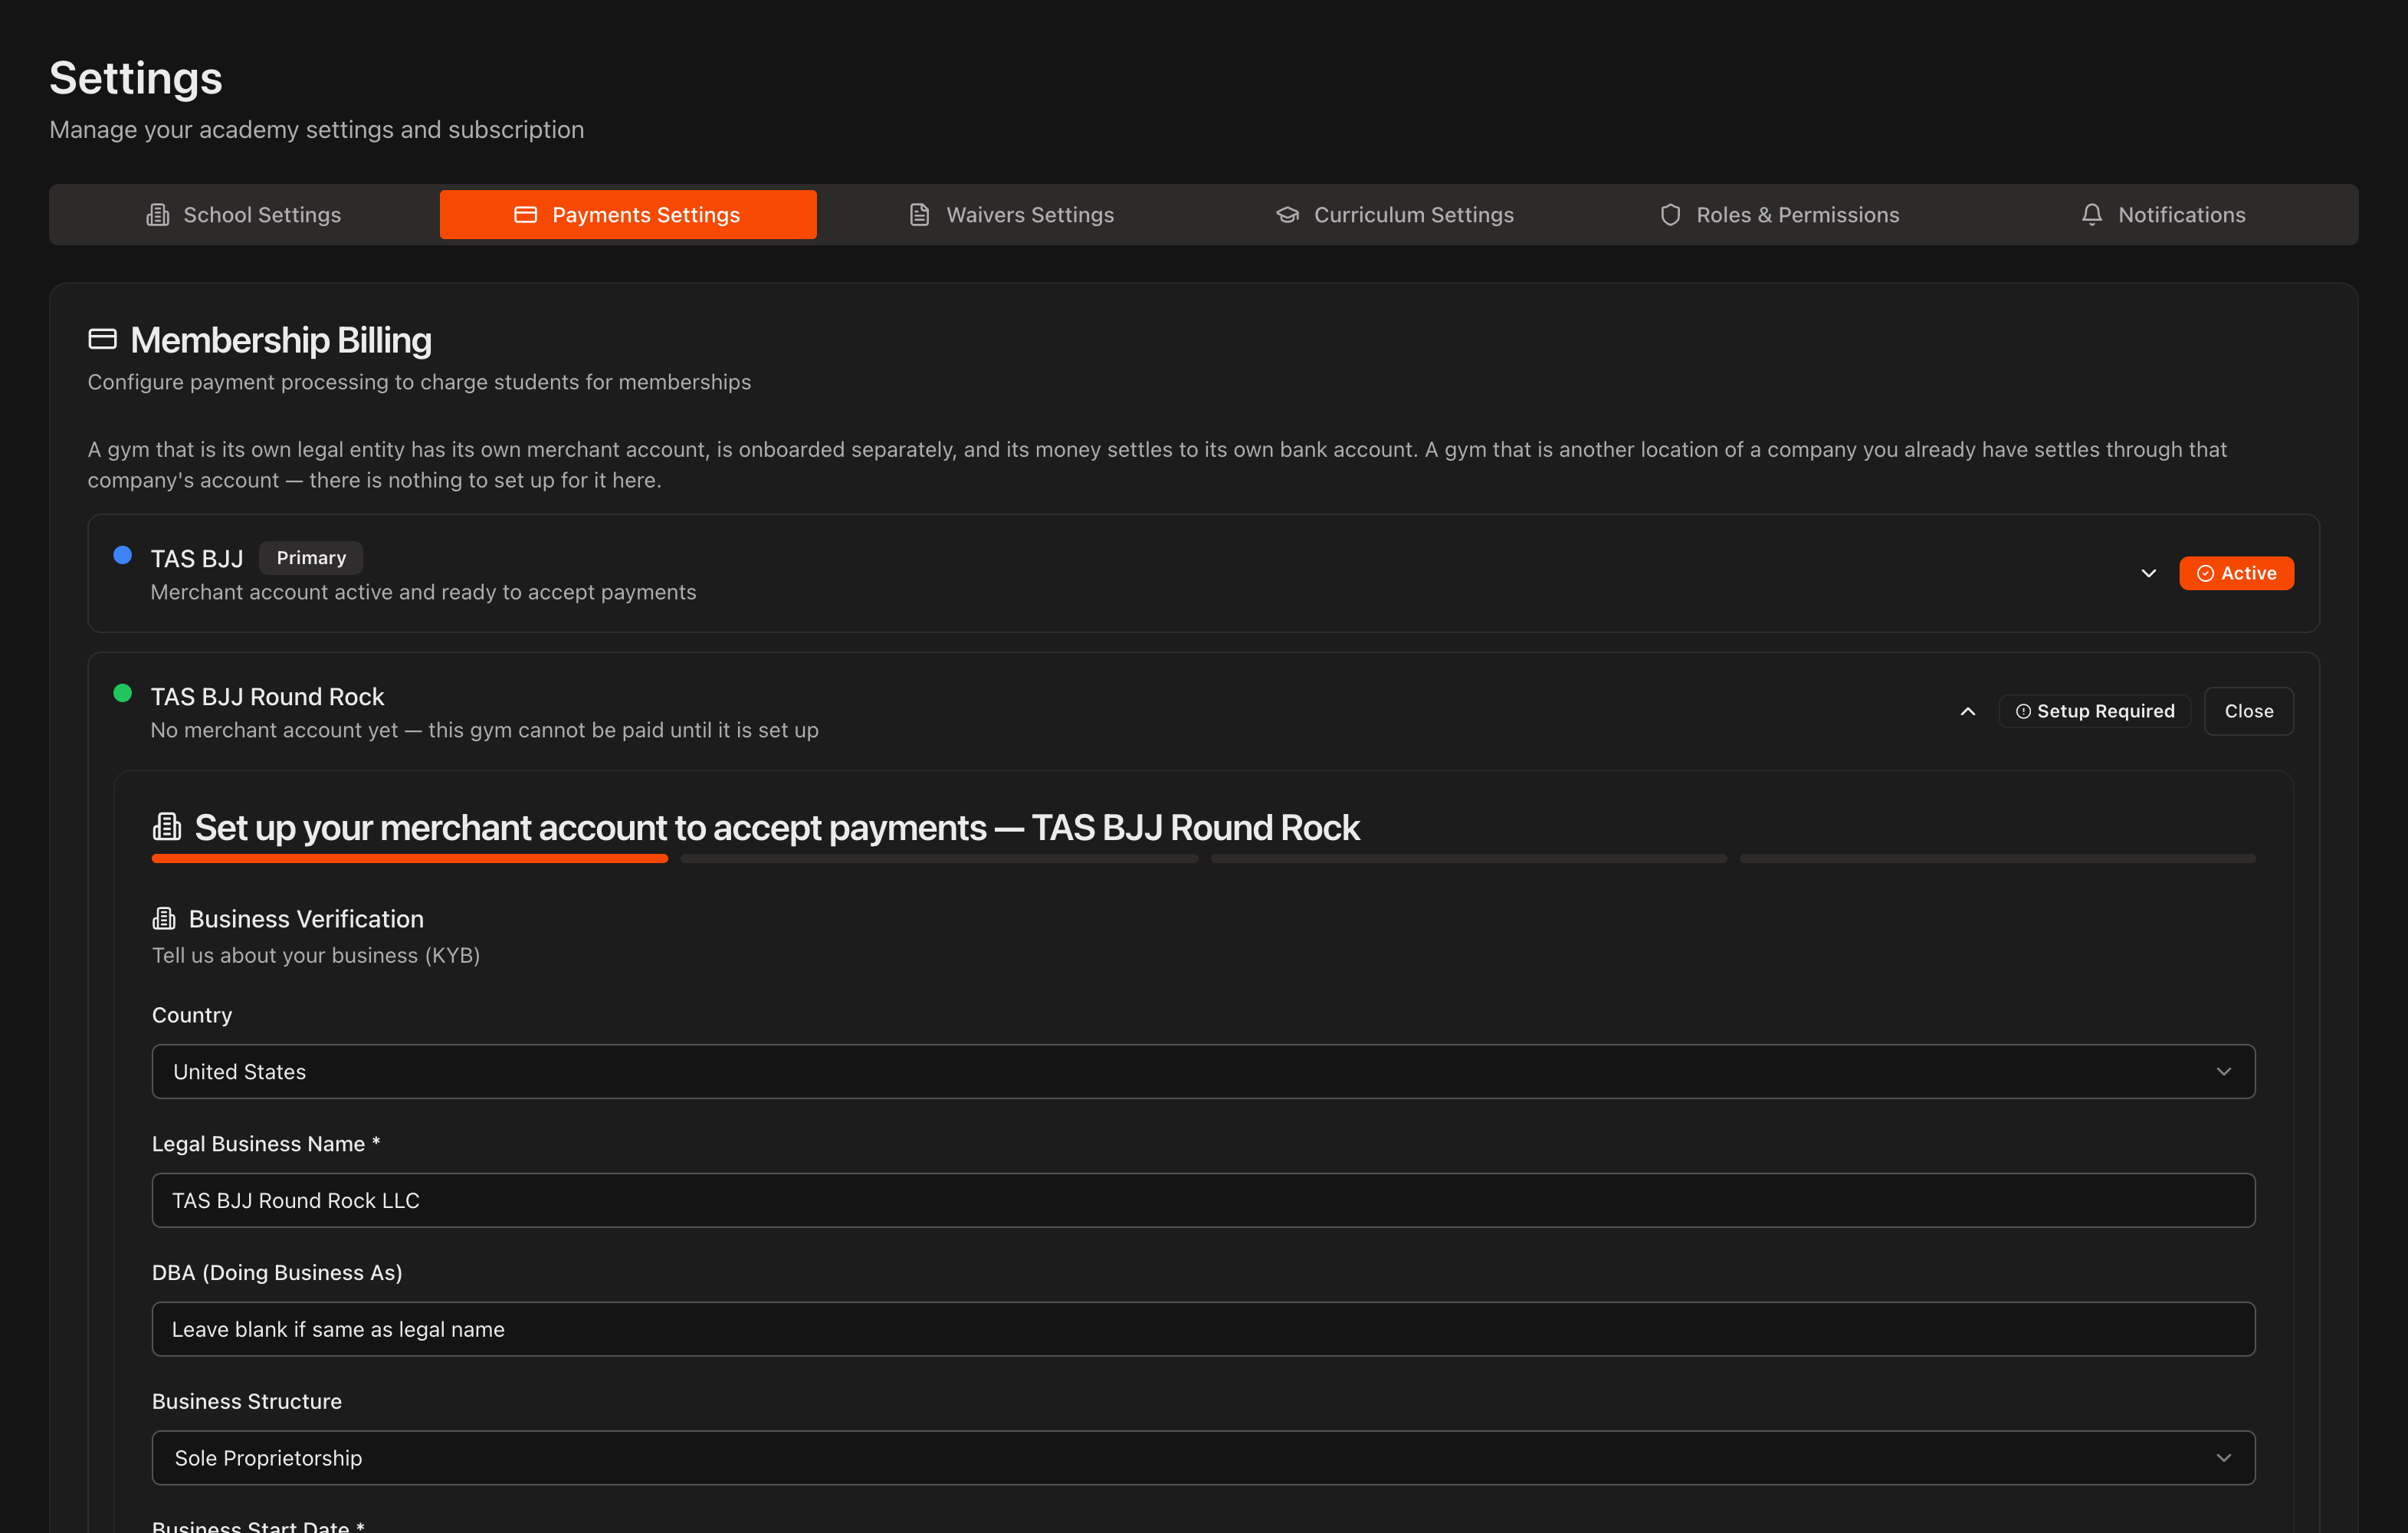
Go to Settings > Payments Settings. Under Membership Billing, every gym now has its own row with its own payment status.
On the new gym's row, click Set up payments and complete the application (business verification, owner information, processing estimates and bank account), just as described in Apply To Accept Payments.
Until the processor approves it, the row shows Setup Required and no one at that gym can be charged. Your original gym keeps taking payments the whole time.
Note
A gym added as another location of an existing company has nothing to set up here. It settles through that company's merchant account.
Tip
Under **Sales Tax**, each tax now has an **Applies at** setting: **All gyms** or **Selected gyms**. A new gym inherits every All gyms tax automatically.
Set each student's home gym
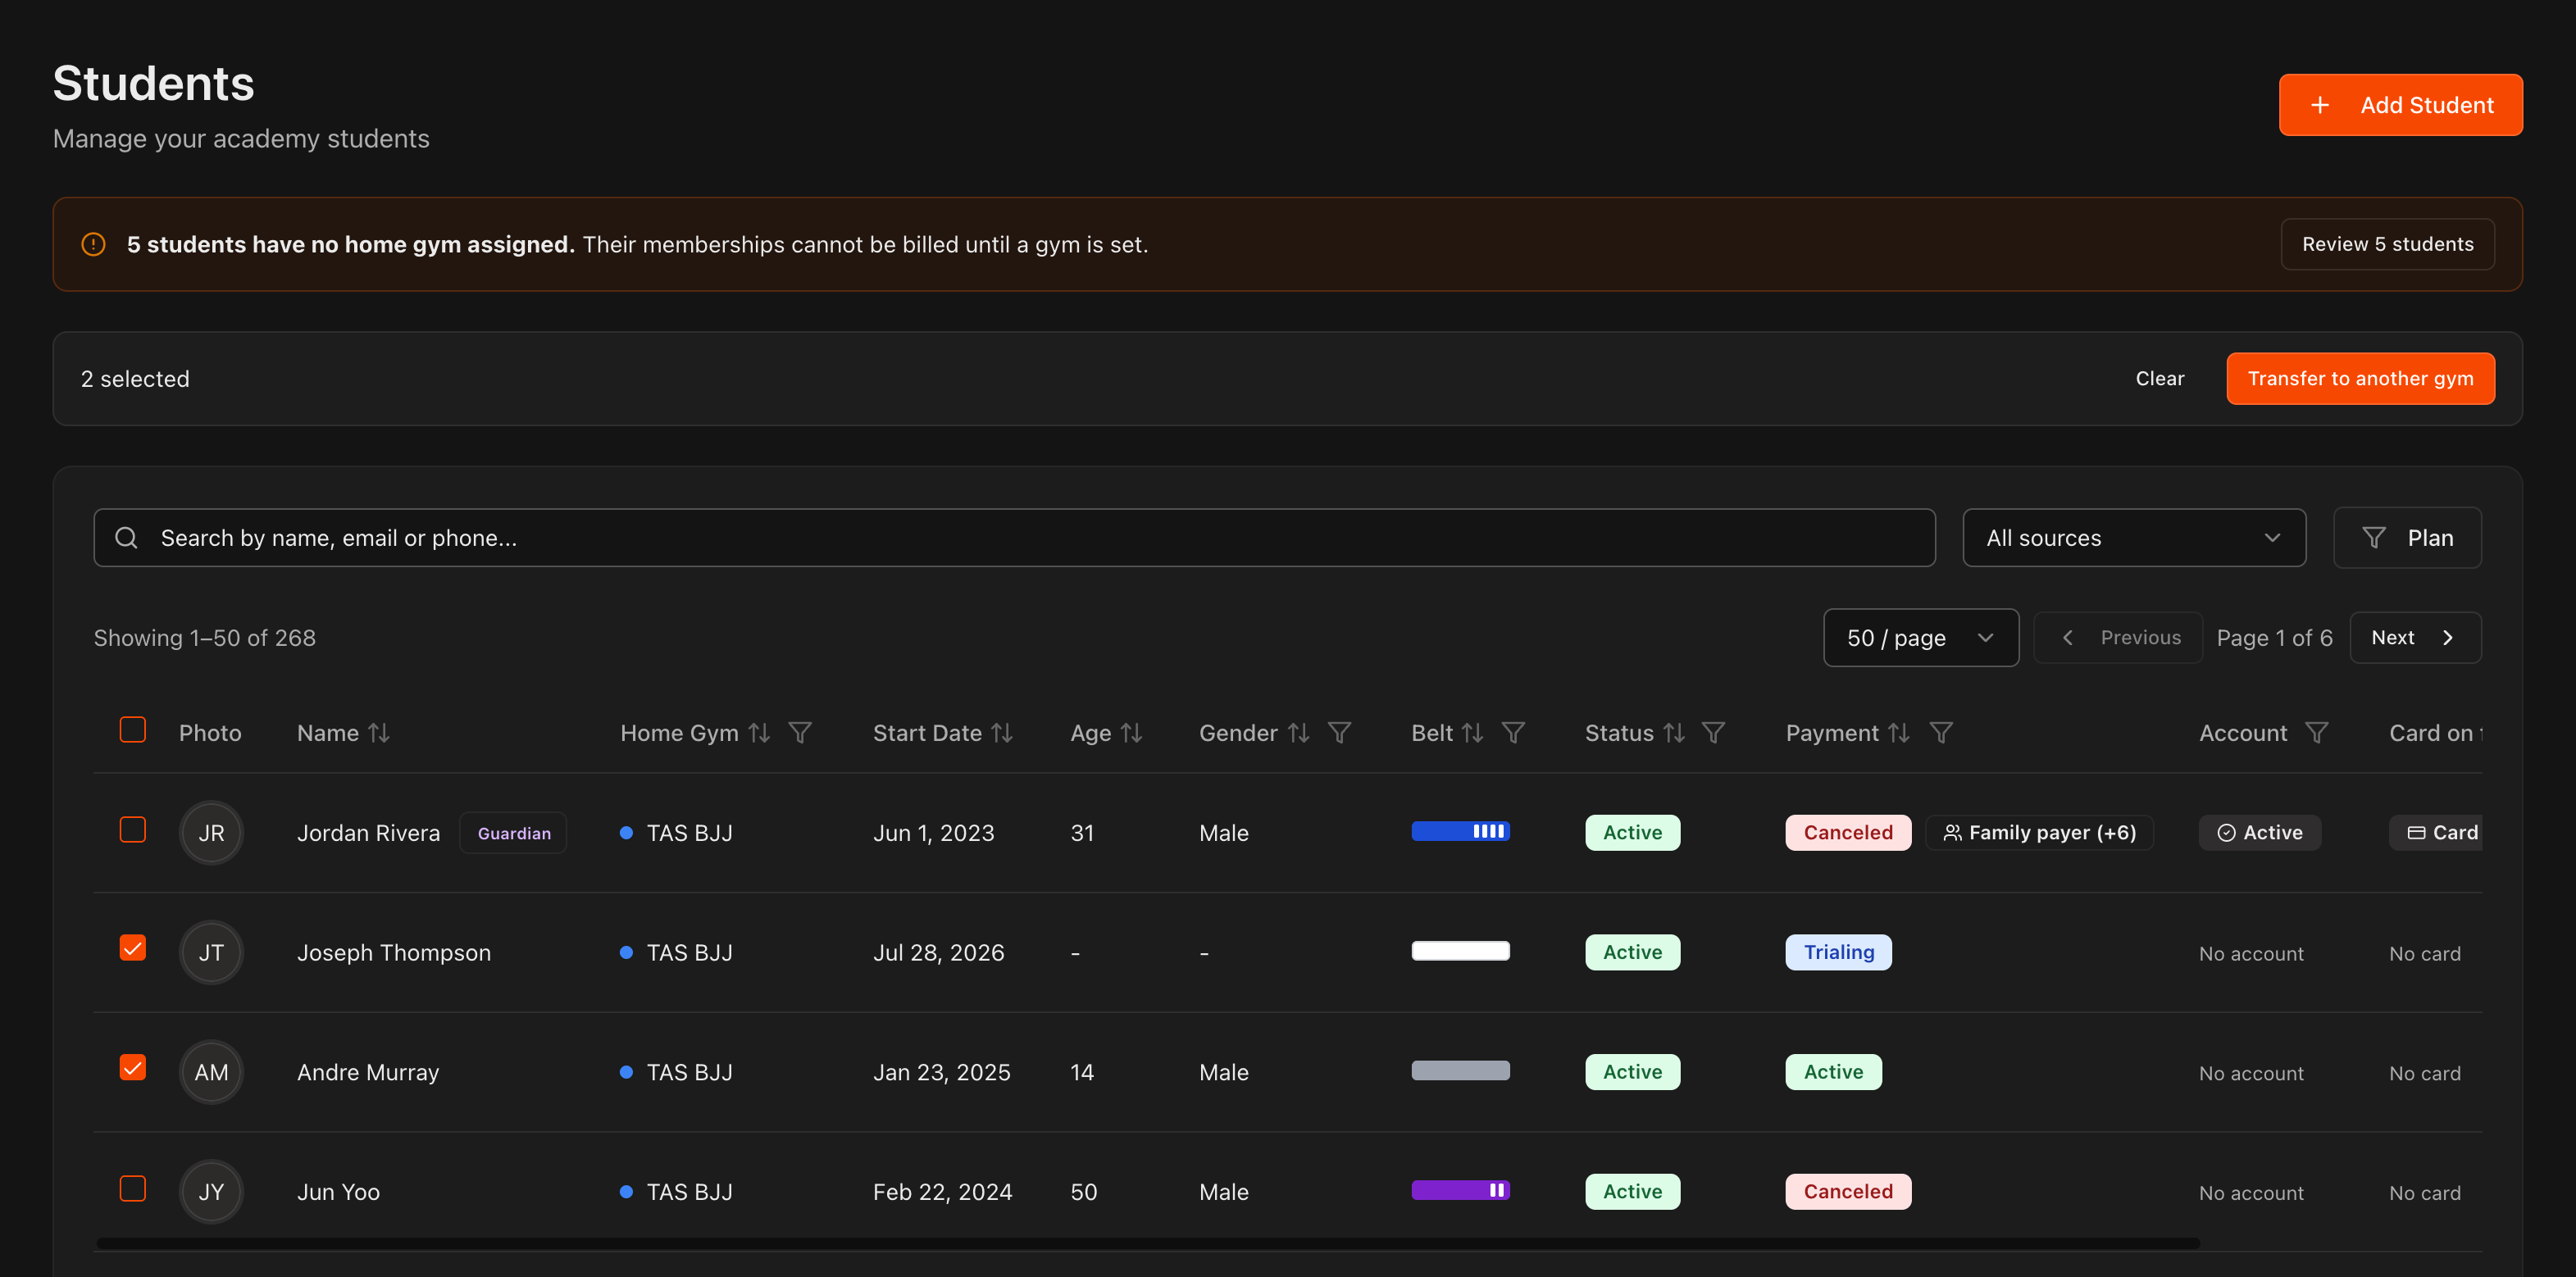
A student's home gym decides which gym's bank account their membership payments settle to. Existing students stay where they are until you move them; students created from a gym's lead form get that gym automatically.
To move students in bulk, open the Students page with the selector on All Gyms, tick the students, and click Transfer to another gym. Choose the Destination gym and whether to Bill the new gym from the next renewal or Keep billing the current gym, then click Transfer.
To move one student, open Student Information > Details and change Home Gym.
Note
Students without a home gym are listed in a banner at the top of the **Students** page, and their memberships cannot be billed until a gym is set.
Caution
Past attendance and revenue stay with the gym that earned them. From the transfer onward, the student's waivers, attendance and reporting follow the new home gym.
Add a class schedule for the new gym
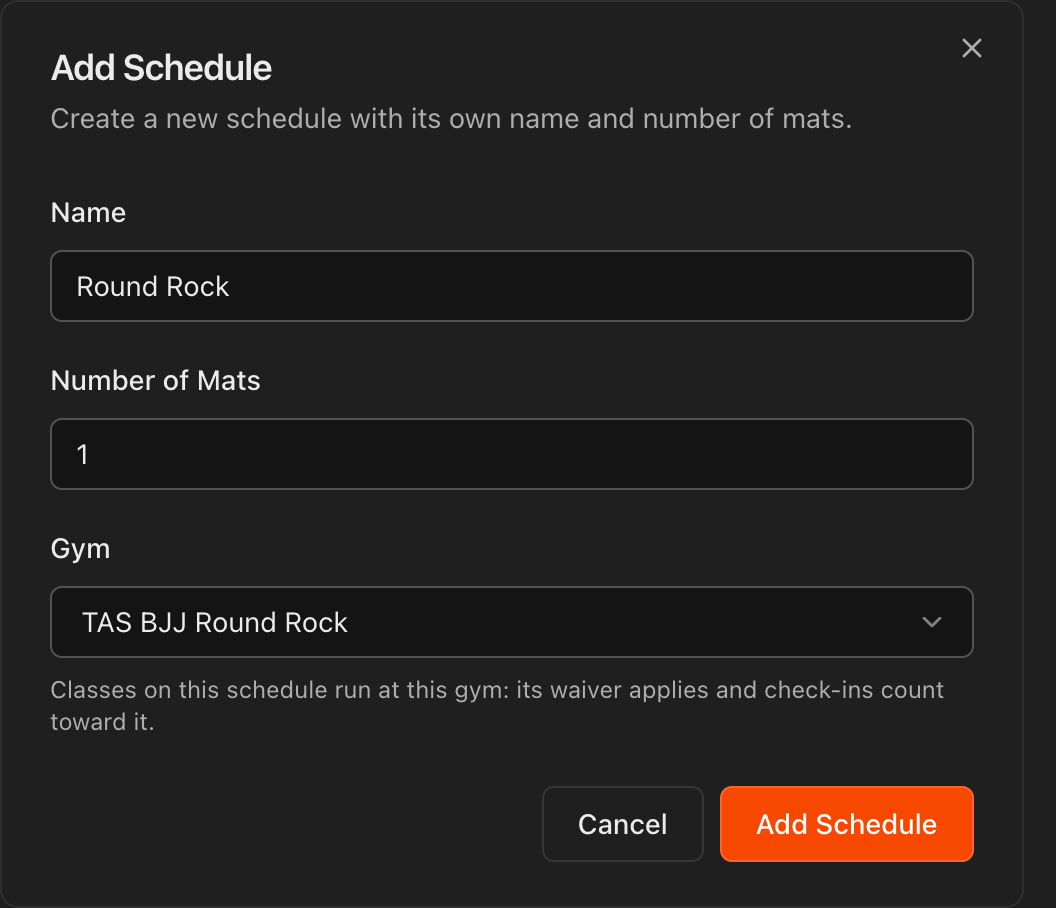
Go to Schedule and click Add Schedule. Give it a Name and Number of Mats, choose the new gym under Gym, and click Add Schedule.
Add classes to that schedule as usual. Classes on it run at that gym, so check-ins count toward it and the gym's waiver applies.
On the Attendance page, use the All Schedules dropdown to show one schedule at a time. Staff can still mark any student present at any gym.
Note
Check-in does not work at a gym whose schedule has no classes. A class added to another gym's schedule counts attendance there, not at the new gym.
Choose the new gym's standard waiver
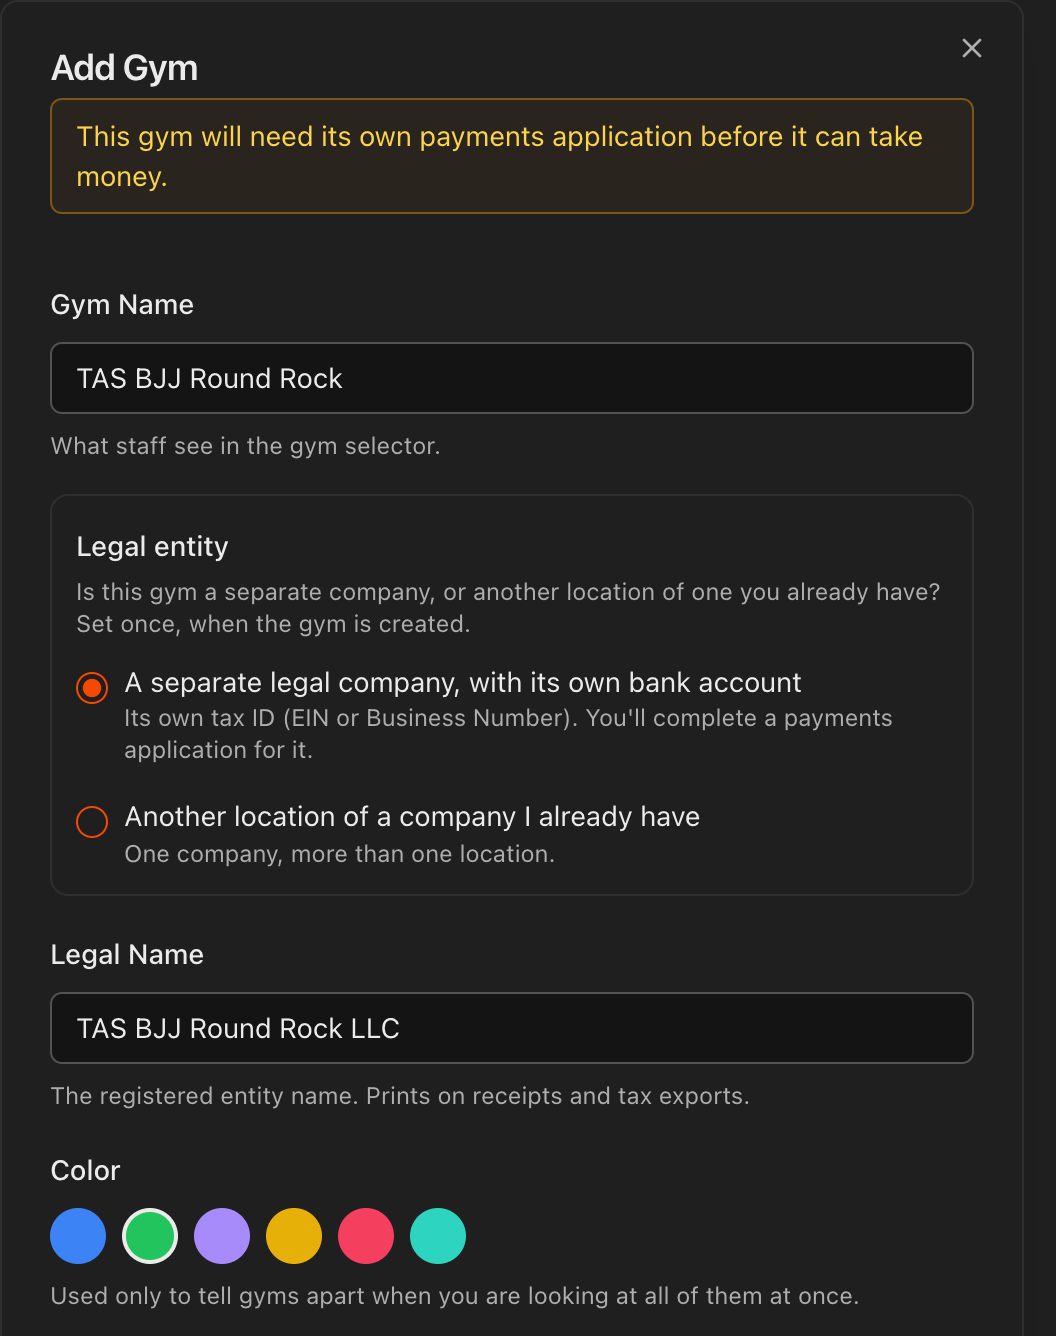
Go to Settings > Waivers Settings and scroll to Standard Waiver. The Standard waiver per gym section lists each gym.
Leave a gym on Use the academy-wide waiver to fall back to your academy standard waiver, or pick a template just for that gym. Templates can also be limited to specific gyms, shown in the Gym column of Waiver Templates.
Each gym is its own legal entity, so a waiver signed for one does not release the other. A student training at a gym other than their home gym must sign that gym's waiver before they can be marked present or check in.
Tip
Open any student's **Documentation** tab to see **Waiver status by gym**, which shows which gyms they have signed for.