Ative o quiosque e defina as janelas de check-in
Acesse Settings e abra Check-In Kiosk.
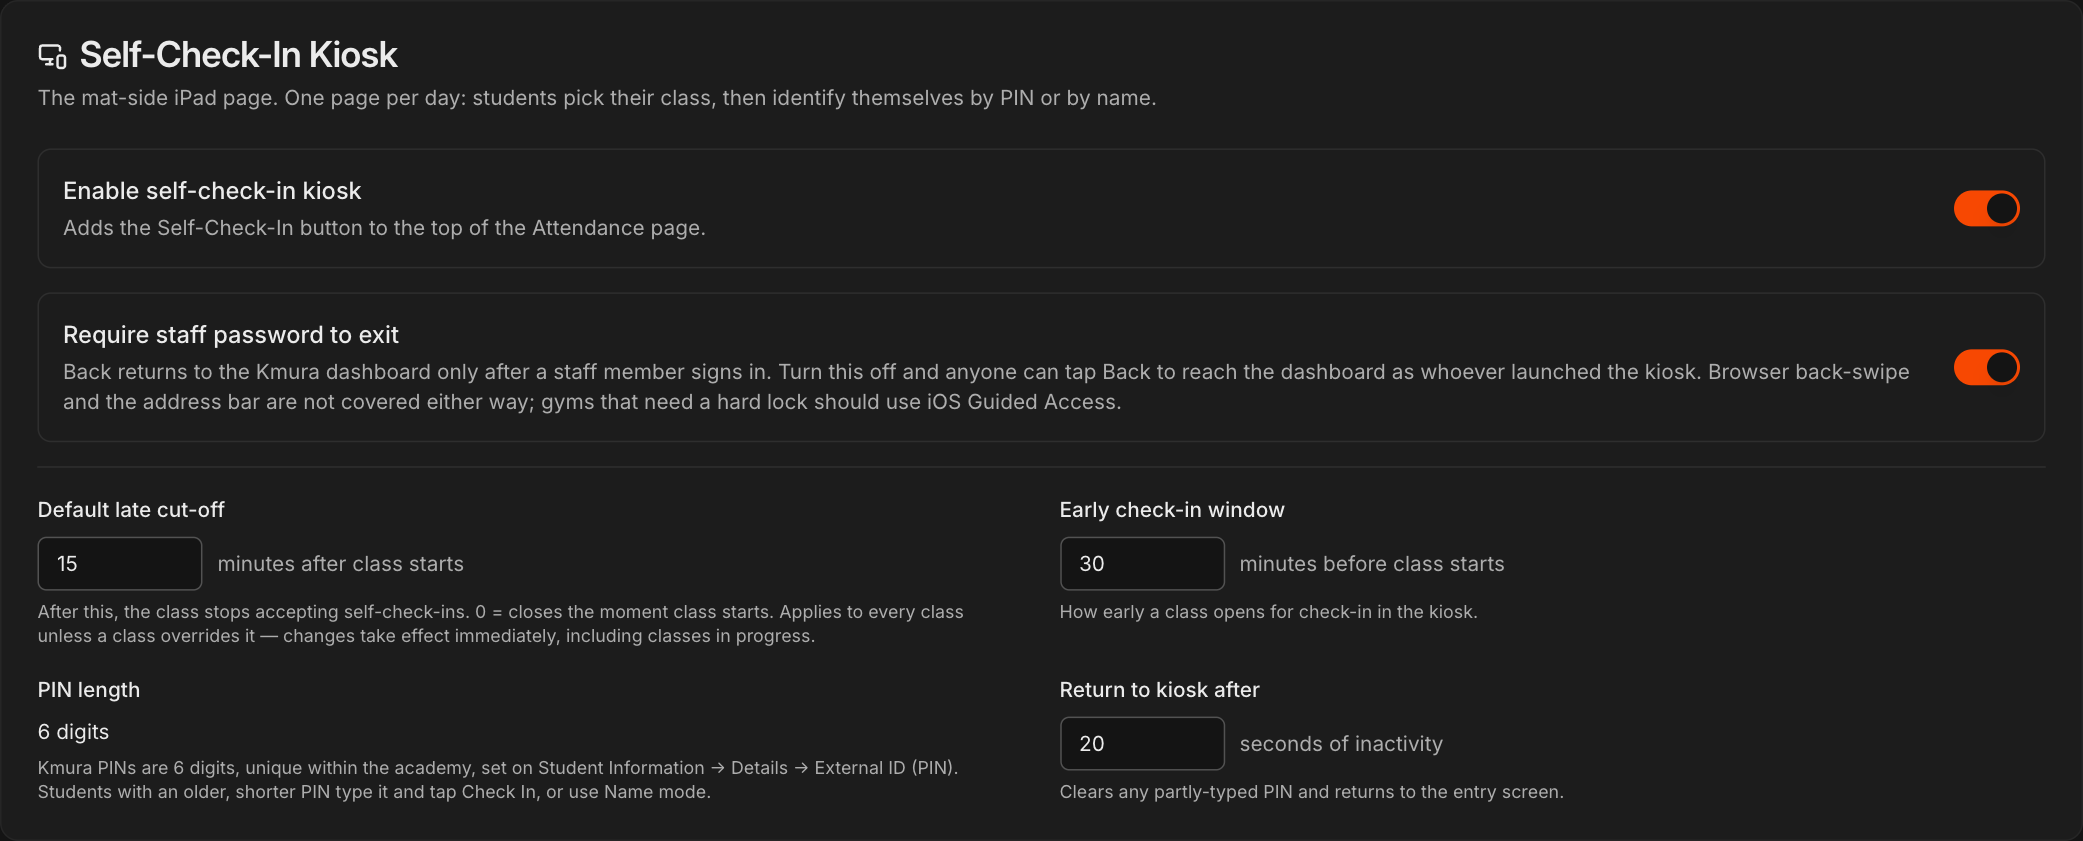
Ative Enable self-check-in kiosk, que adiciona o botão Self-Check-In no topo da página Attendance.
Defina em Early check-in window quantos minutos antes do início da aula o quiosque deve abrir o check-in.
Defina em Default late cut-off quantos minutos depois do início da aula o quiosque deve parar de aceitar check-ins.
Defina em Return to kiosk after quantos segundos de inatividade apagam um PIN digitado pela metade. O PIN length é sempre de 6 dígitos.
Nota
Um **Default late cut-off** de 0 fecha o check-in no momento em que a aula começa. As alterações valem na hora, inclusive para aulas em andamento.
Decida como a equipe sai do quiosque
Na mesma seção Self-Check-In Kiosk, ative ou desative Require staff password to exit.
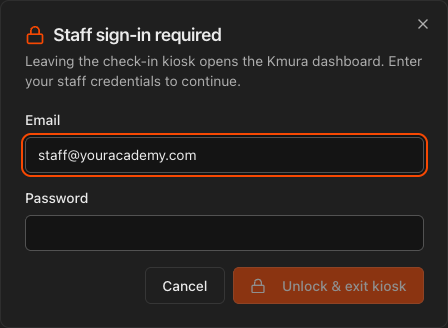
Com a opção ativada, tocar em Back abre a janela Staff sign-in required, e o quiosque só volta ao painel depois que alguém da equipe faz login.
Com a opção desativada, qualquer pessoa pode tocar em Back e cair no seu painel com o login de quem abriu o quiosque.
Atenção
Isso vale só para o botão **Back**. O gesto de voltar do navegador e a barra de endereços continuam disponíveis de qualquer forma, então use o Acesso Guiado do iOS em um iPad compartilhado se precisar de um bloqueio total.
Dê um PIN a cada aluno
Todo PIN do Kmura tem 6 dígitos, só números, e é único dentro da sua academia. Alunos novos e importados recebem um automaticamente.
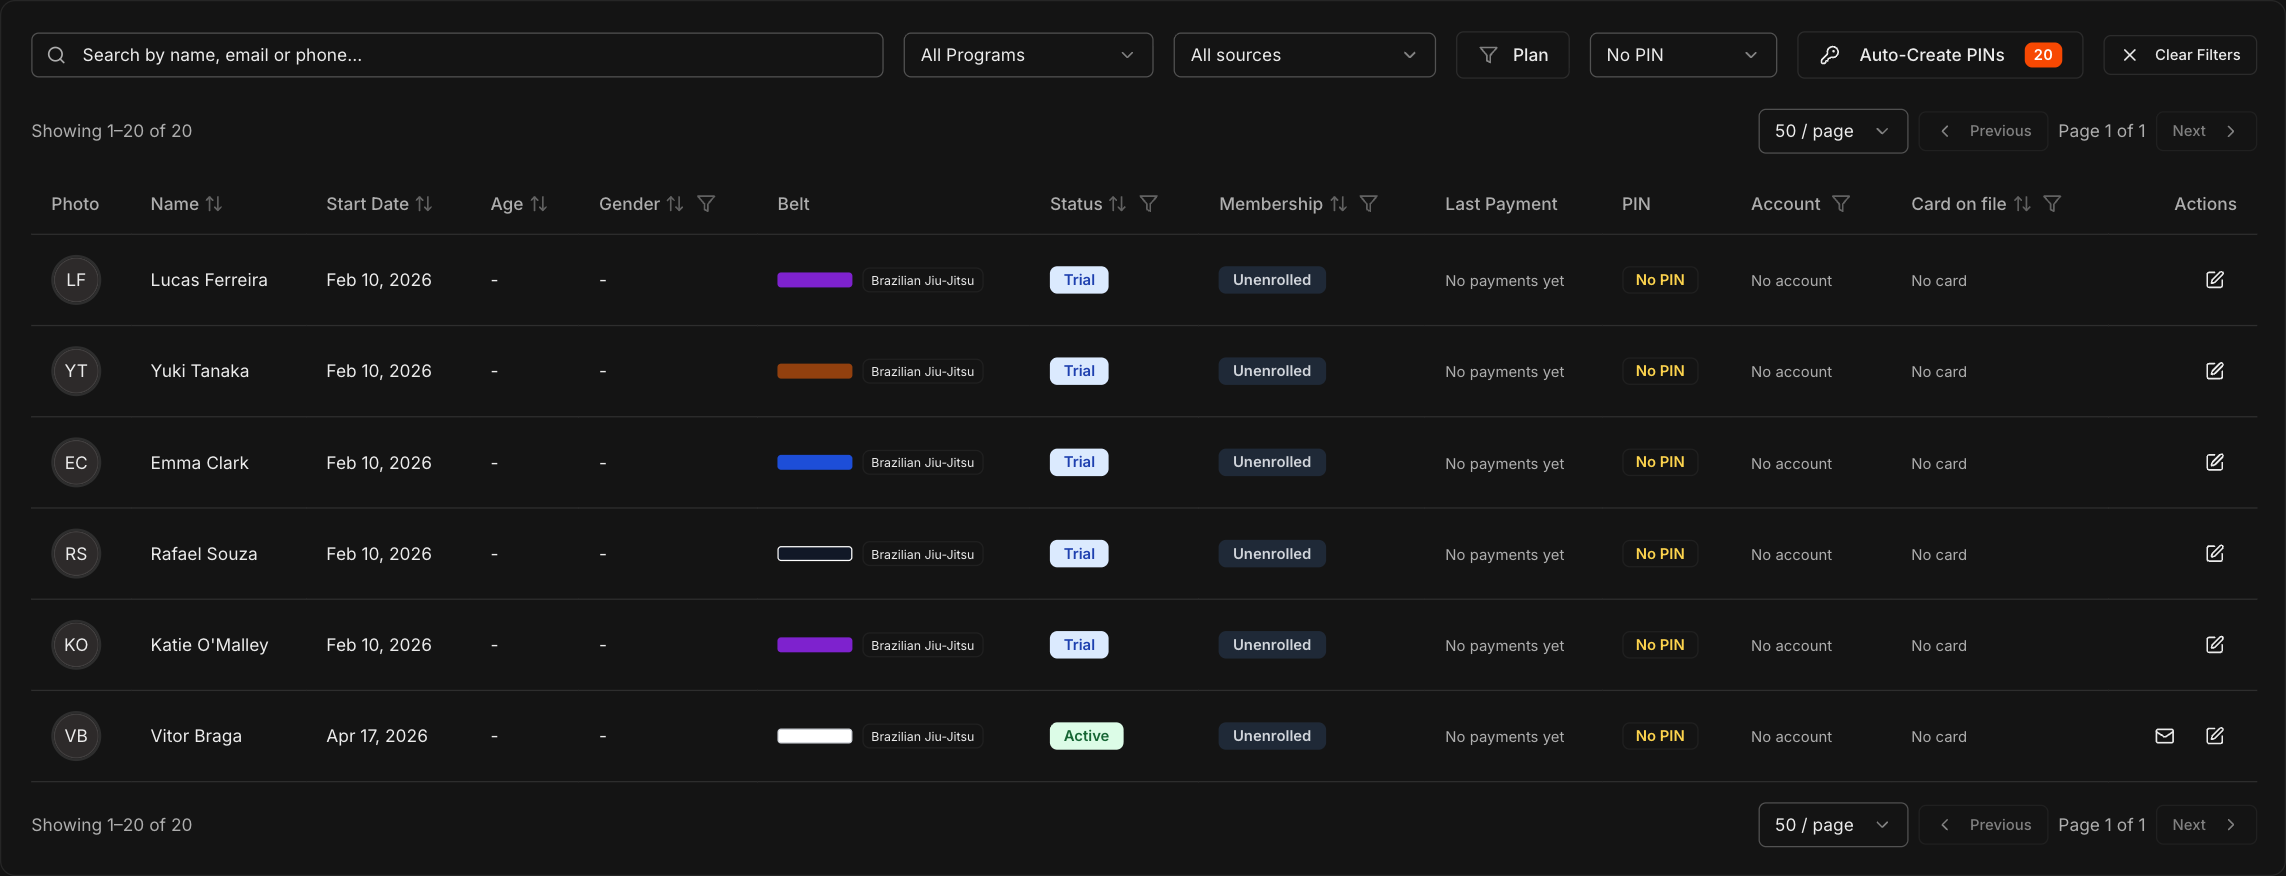
Na página Students, a coluna PIN mostra o PIN de cada aluno. Defina o filtro All PINs como No PIN para encontrar quem ainda não tem um.
Clique em Auto-Create PINs para dar a todos eles um PIN aleatório de 6 dígitos de uma vez. Quem já tem PIN continua com o seu.
Para definir um manualmente, abra a aba Details do aluno e edite External ID (PIN). O Kmura não salva um PIN com o tamanho errado ou que já pertença a outro aluno.
Nota
Alunos com um PIN antigo, mais curto, continuam com ele até você trocá-lo. No quiosque, eles digitam o PIN e tocam em **Check In**, ou usam o modo **Name**.
Imprima os cartões de check-in
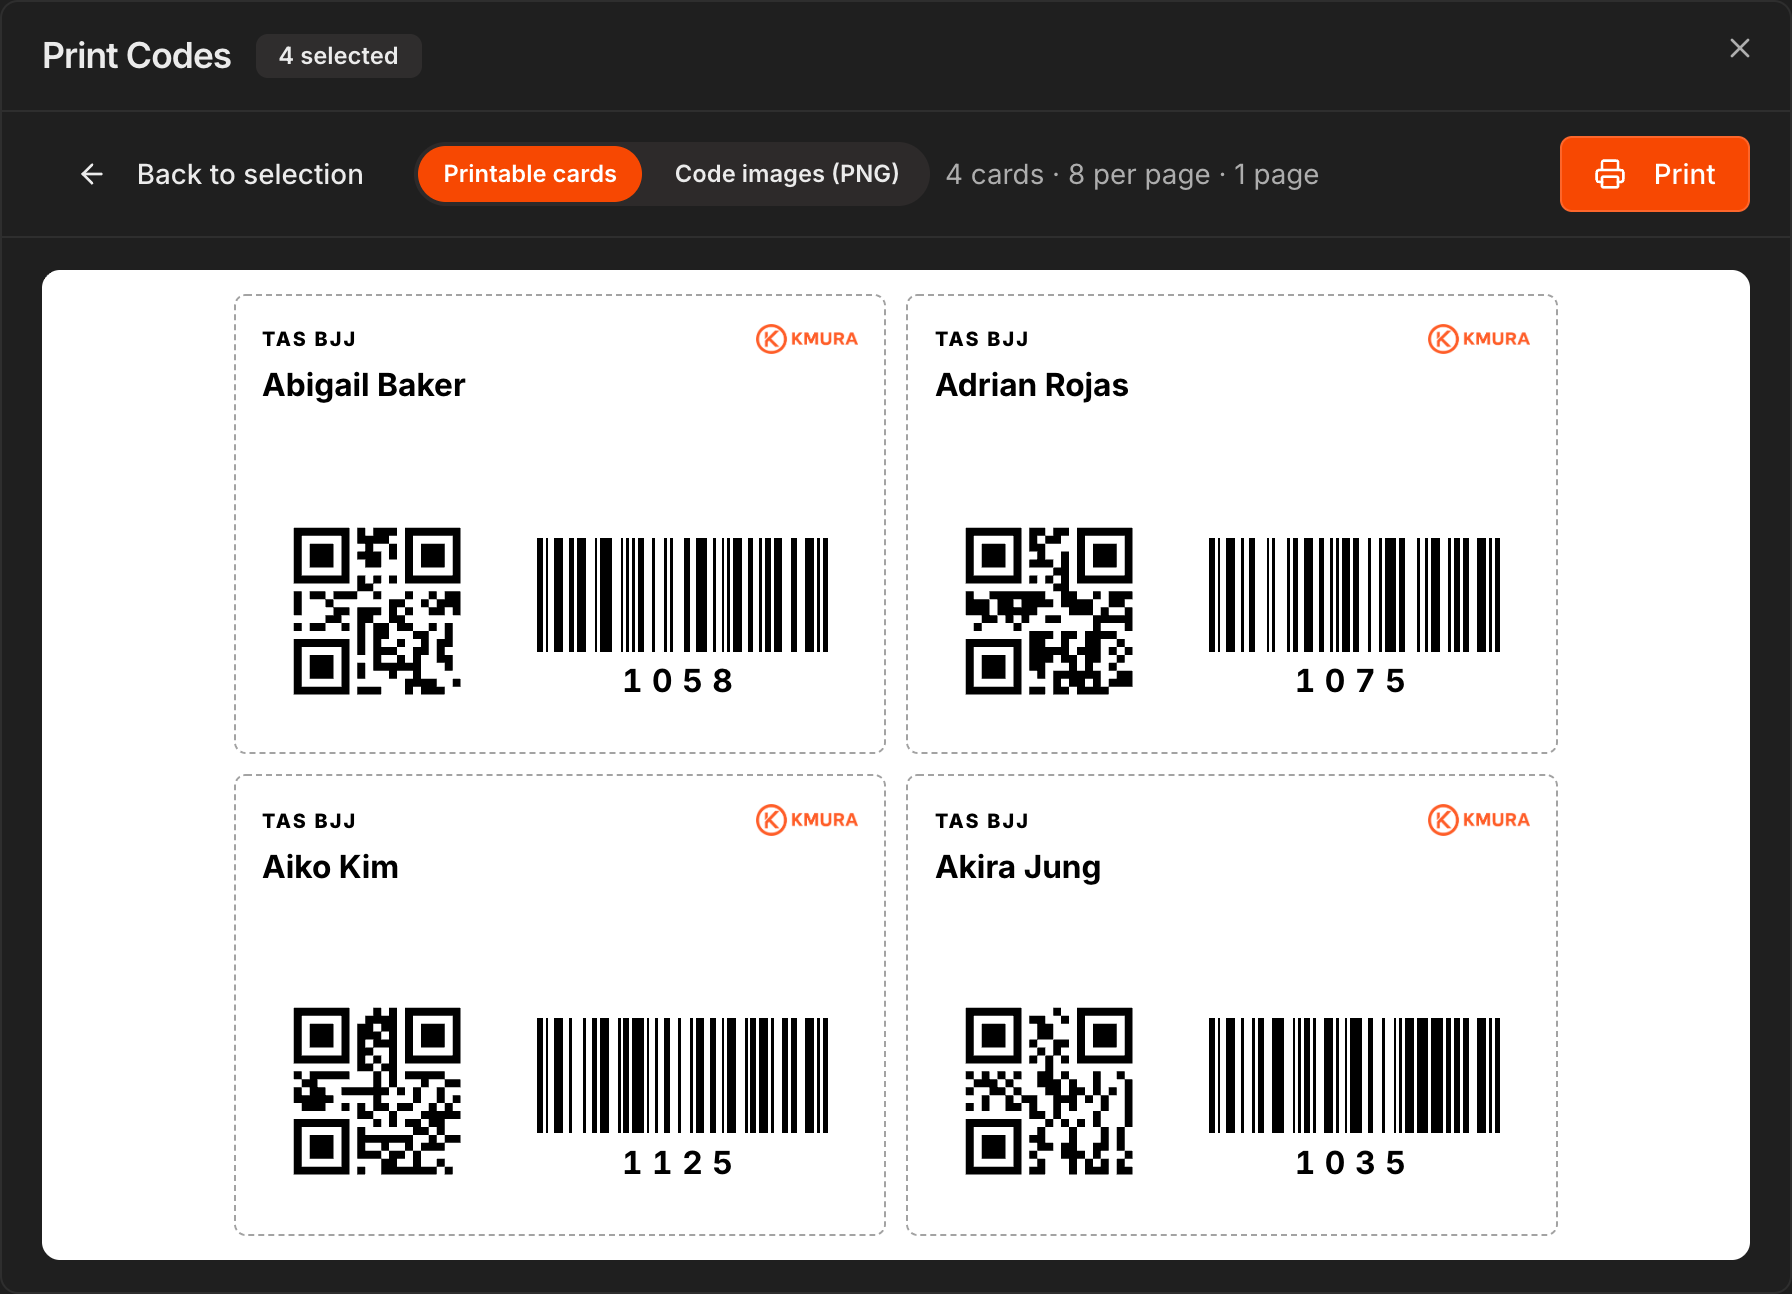
Na página Attendance, clique em Print Codes, marque os alunos desejados (ou Select all students) e clique em Preview cards.
Cada cartão mostra o logo da sua academia, o logo do Kmura, o nome do aluno, um QR code, um código de barras e o PIN em dígitos legíveis. São 8 cartões por folha.
Clique em Print, ou mude para Code images (PNG) para baixar só os códigos e usar no seu próprio design de cartão.
Para imprimir o cartão de um único aluno, abra a aba Details dele e clique em Print Card ao lado de External ID (PIN). Download Codes salva os códigos dele como imagens.
Nota
Os códigos carregam um código de leitura que o Kmura atribui e que ninguém pode editar, então trocar o PIN de um aluno nunca invalida um cartão impresso. Se um cartão for perdido, clique em **Reissue code** na aba **Details** e imprima um novo; o cartão antigo deixa de funcionar.
Abra o quiosque pela página Attendance
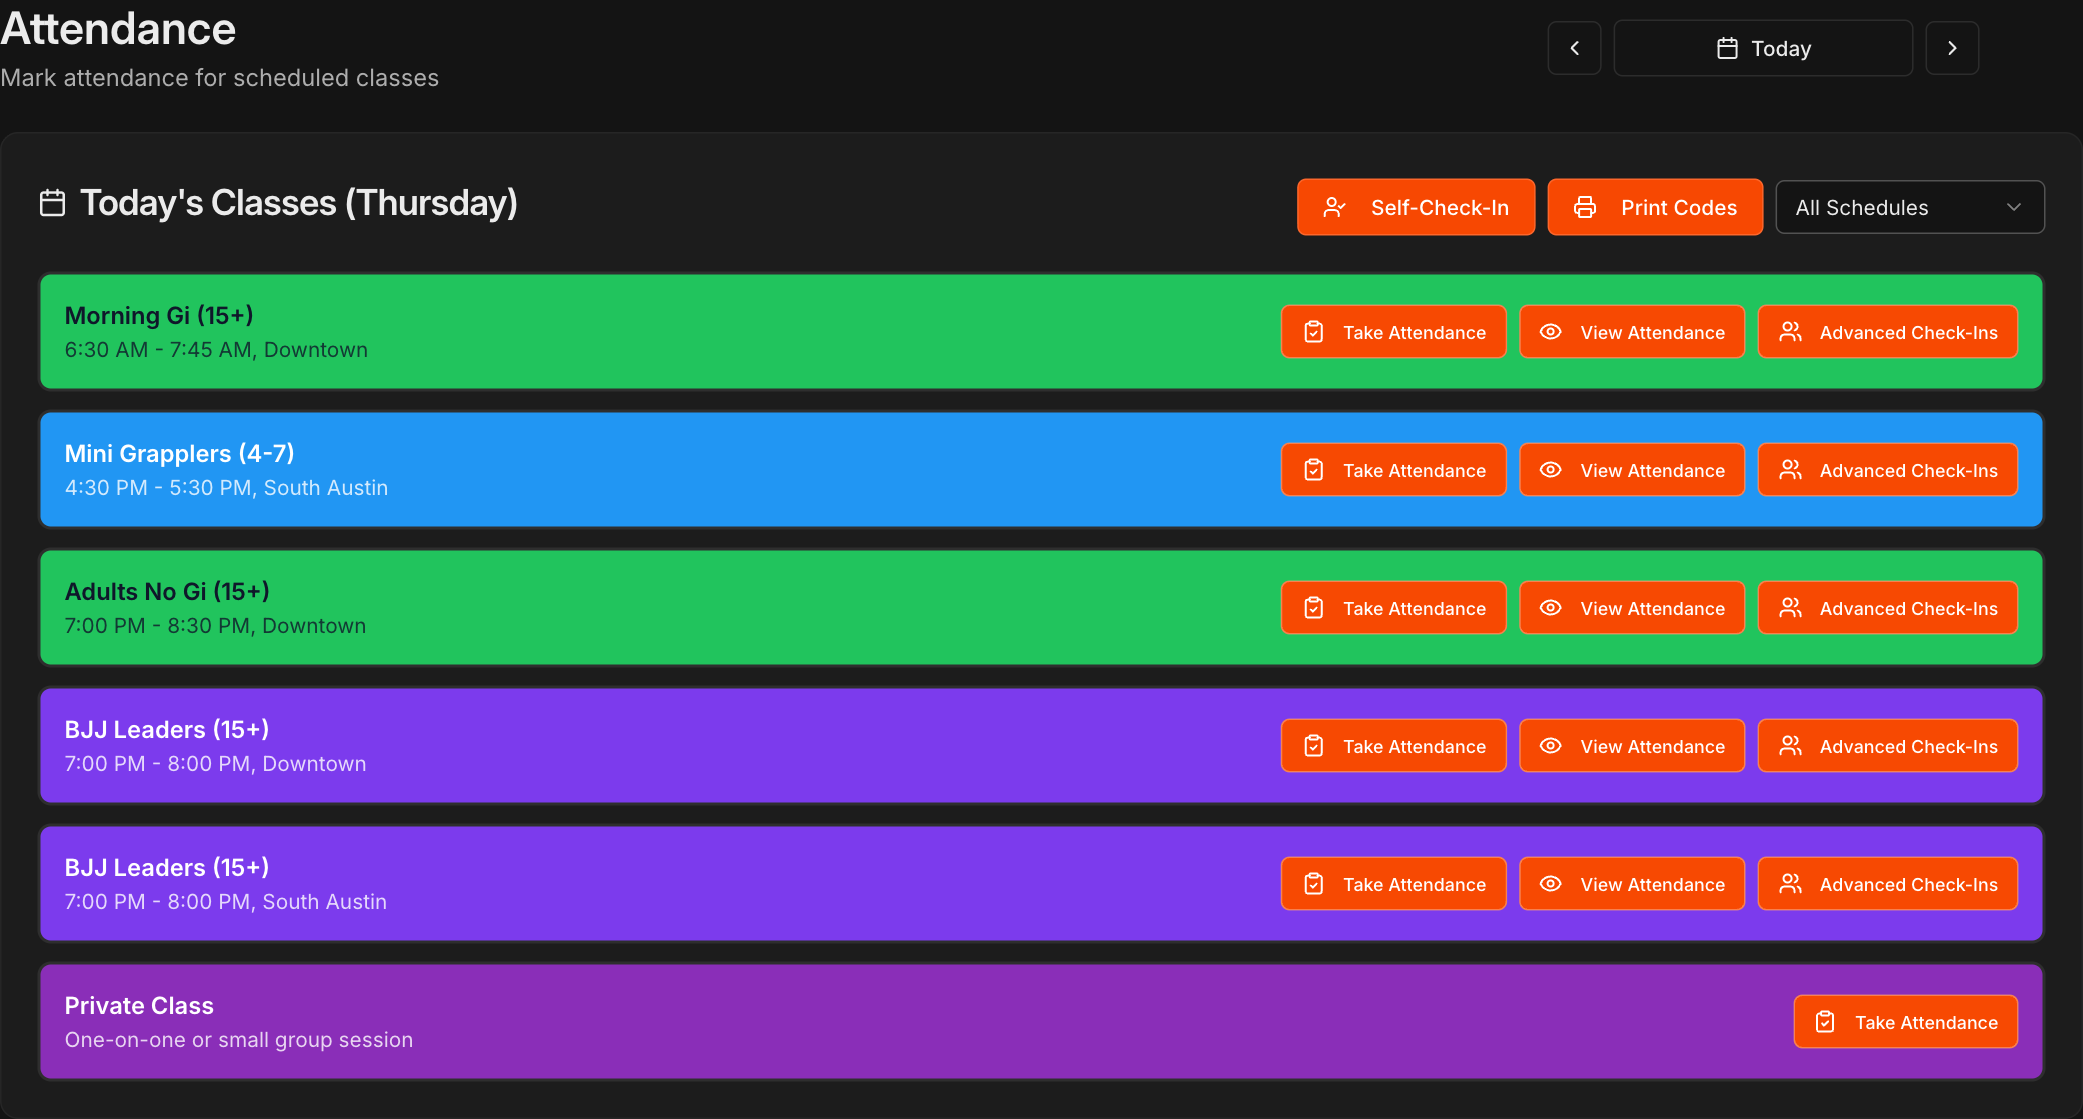
No menu esquerdo, clique em Attendance.
Clique em Self-Check-In no topo da lista de aulas, ao lado de Print Codes e do filtro All Schedules.
Deixe essa página aberta no iPad ou no computador da recepção ou da entrada do tatame.
Nota
O botão de auto check-in ficava dentro de cada cartão de aula. Agora ele aparece uma única vez no topo, e a página que ele abre cobre todas as aulas do dia selecionado.
Escolha a aula ou deixe o quiosque escolher
O quiosque abre na aula que está acontecendo agora, ou na mais próxima do horário atual.
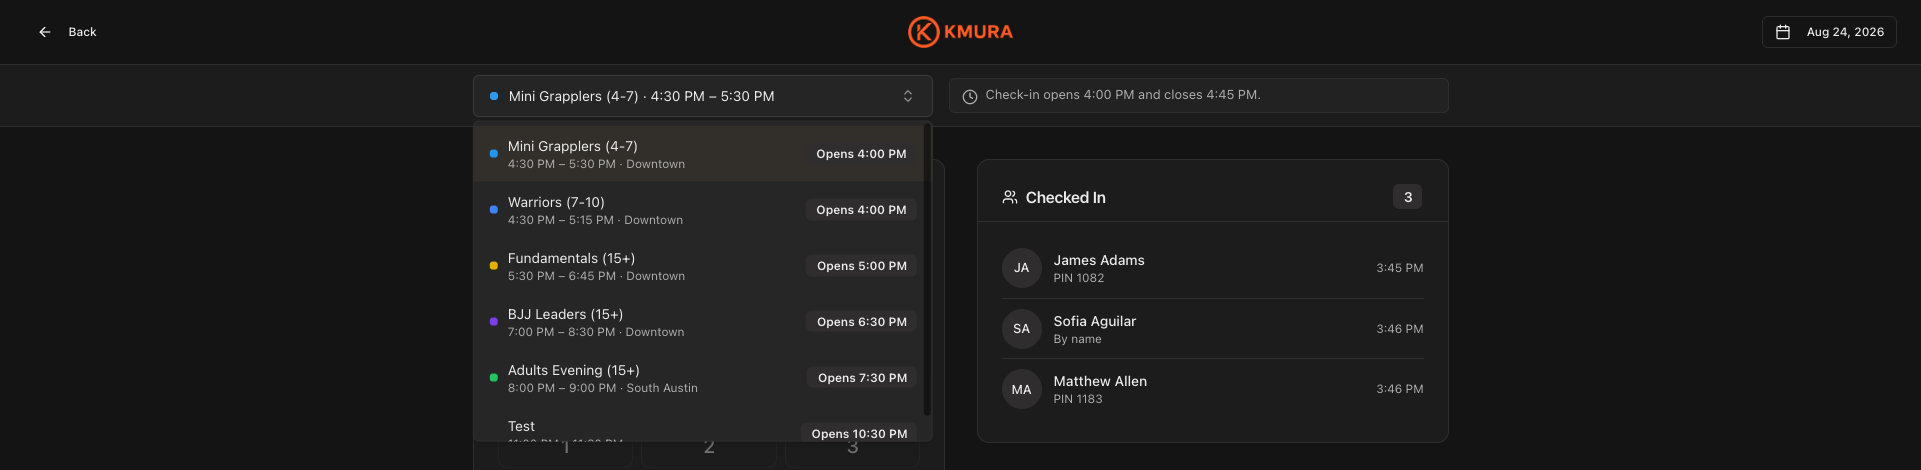
Para trocar, abra o menu de aulas no canto superior esquerdo e escolha qualquer outra aula do dia.
Cada item da lista mostra o horário, a agenda e o horário em que a janela de check-in abre.
O aviso ao lado do menu mostra quando o check-in abre e fecha para a aula selecionada.
Nota
O quiosque exige o seu termo obrigatório para presença. Um aluno que ainda não o assinou é solicitado a assinar antes de o check-in ser concluído.
Os alunos fazem check-in por PIN ou pelo nome
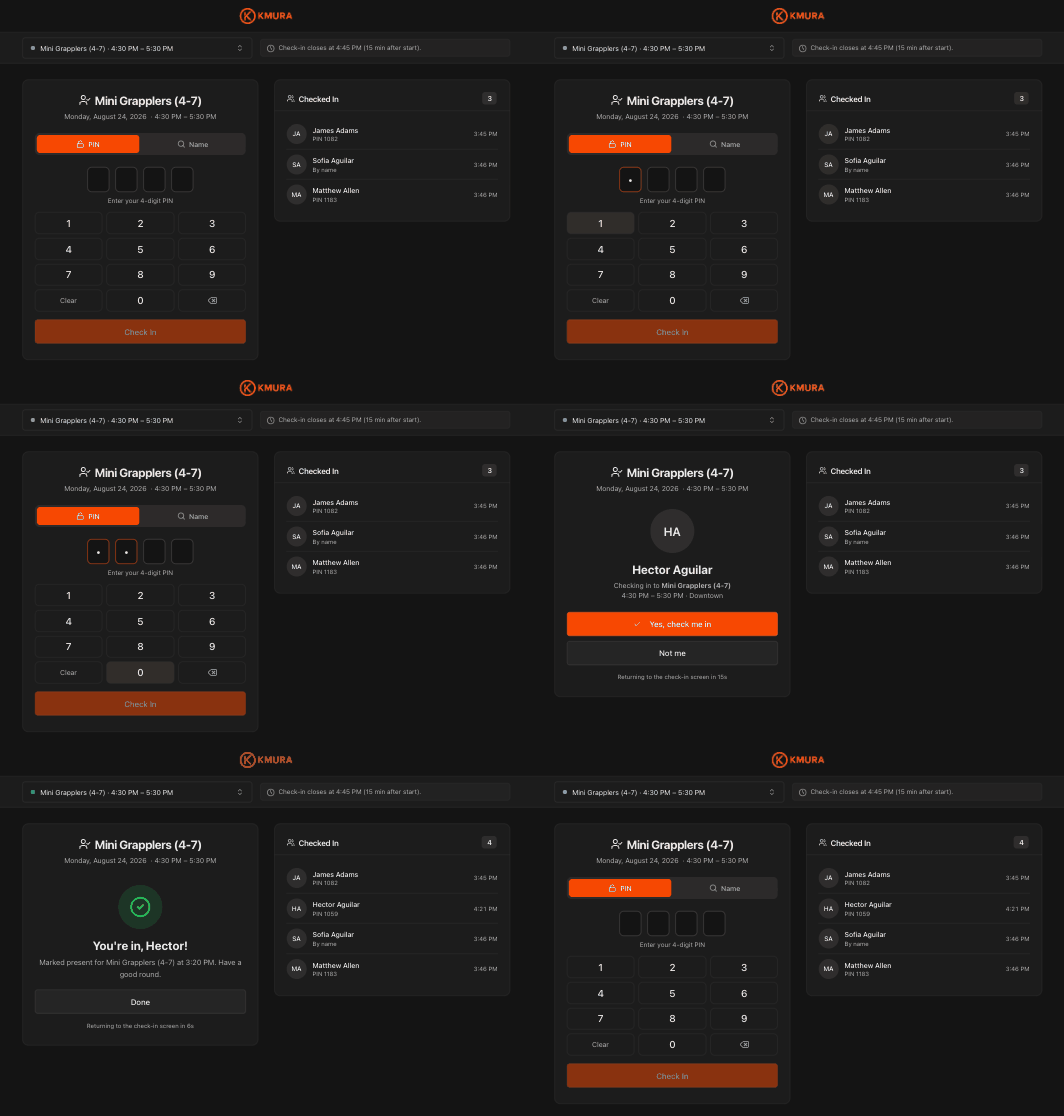
Na aba PIN, o aluno digita o PIN de 6 dígitos no teclado e o quiosque avança assim que o último dígito é digitado. Um aluno com PIN mais curto toca em Check In.
Na aba Name, o aluno abre Select student..., digita parte do nome e se escolhe na lista.
Os dois caminhos mostram um cartão de confirmação com o nome e a aula, onde o aluno toca em Yes, check me in ou Not me.
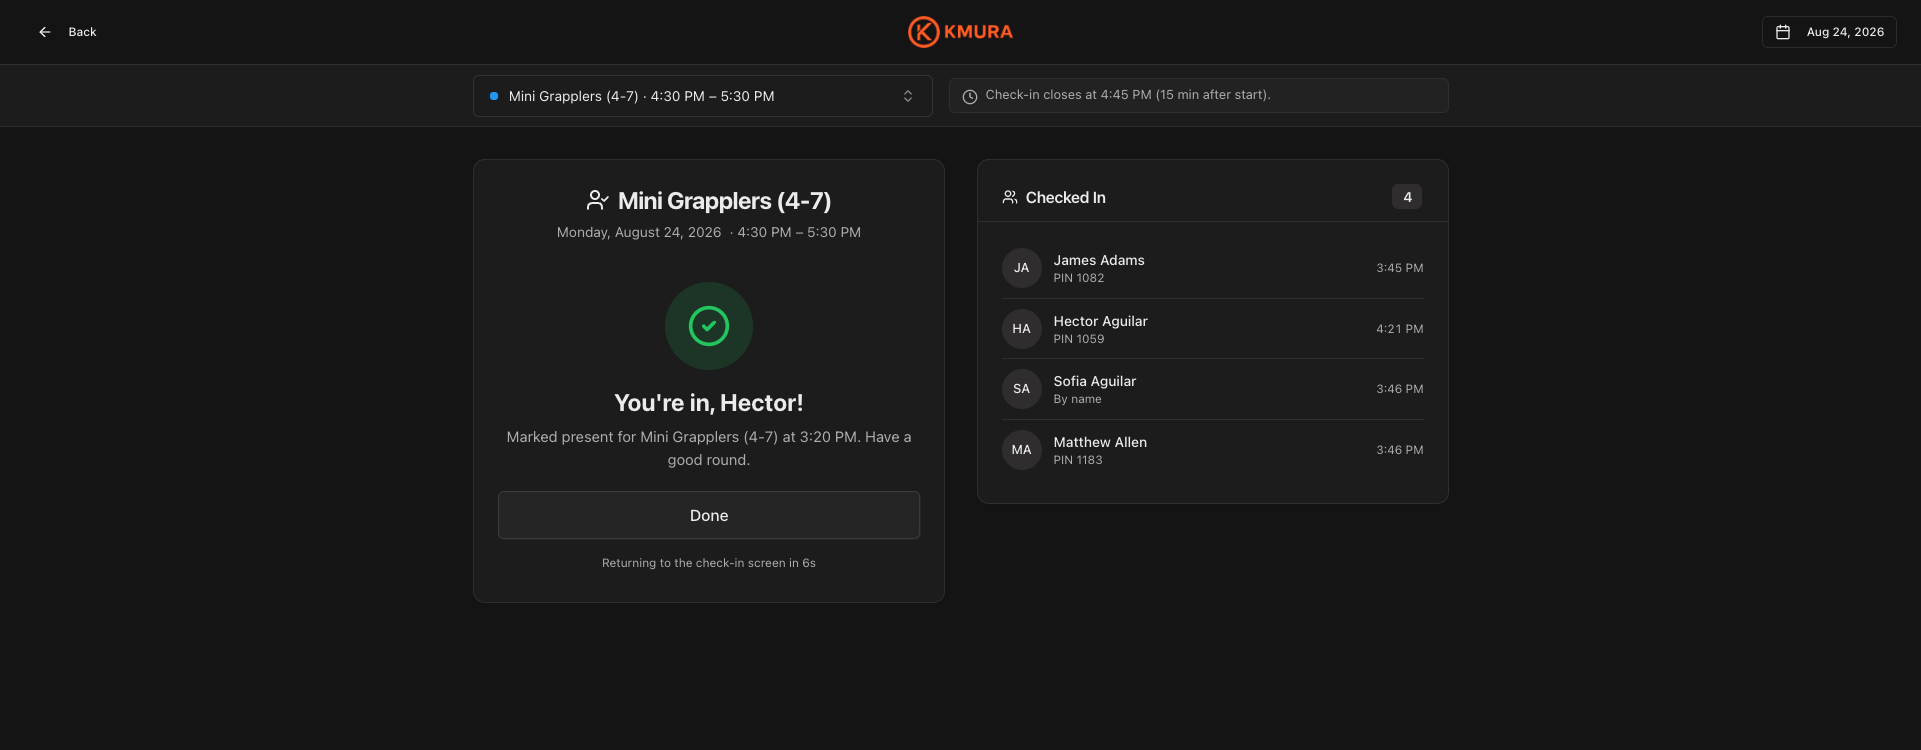
Uma tela verde You're in confirma o check-in, e o quiosque se reinicia para o próximo aluno.
O painel Checked In lista todos que fizeram check-in, por PIN ou pelo nome, e quando. Ele é atualizado a cada 10 segundos, aproximadamente.
Dica
Fora da janela de check-in, o botão mostra **Not open yet** e o teclado fica desativado, para que ninguém faça check-in cedo ou tarde demais por engano.
Os alunos fazem check-in escaneando o cartão
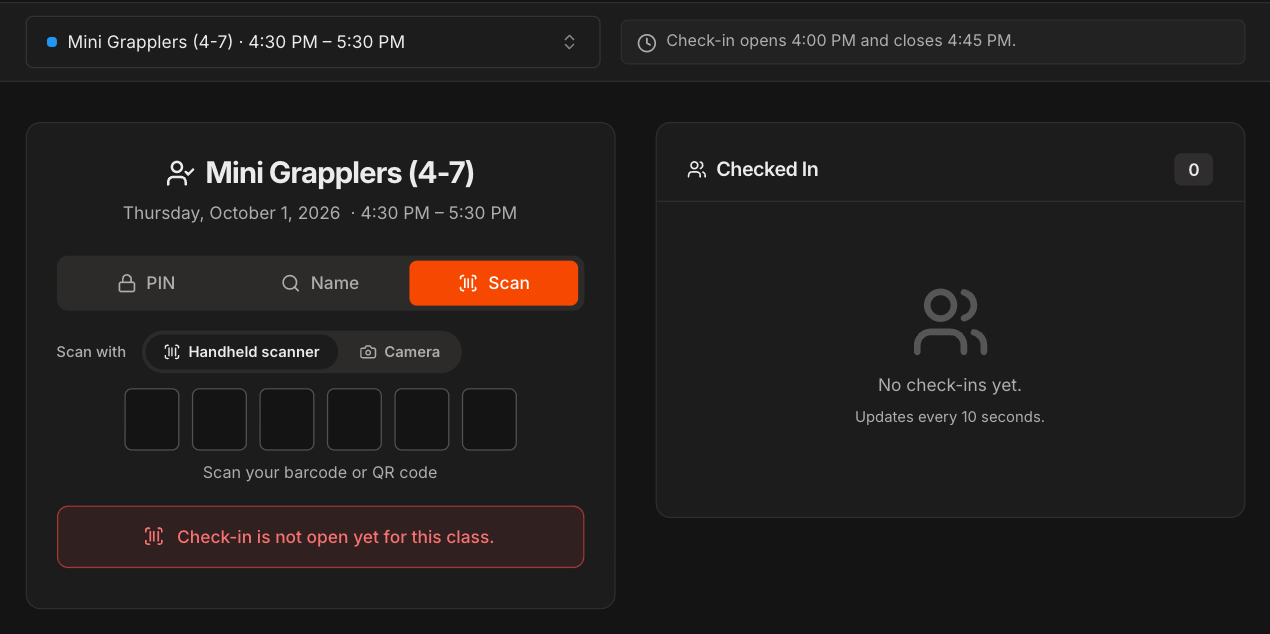
Na aba Scan, o aluno escaneia o código de barras ou o QR code do cartão. Escolha Handheld scanner para um leitor USB, ou Camera para ler QR codes com a câmera do próprio dispositivo.
As caixas do PIN são preenchidas, o nome do aluno aparece, e o quiosque faz o check-in e se reinicia em cerca de dois segundos. Não é preciso tocar em nada, porque o cartão já é a confirmação.
Nota
Fora da janela de check-in, a aba **Scan** mostra **Check-in is not open yet for this class.**
Dica
Um leitor de código de barras USB comum funciona sem drivers nem configuração. Basta conectá-lo ao dispositivo que roda o quiosque.
Altere o horário limite de uma única aula
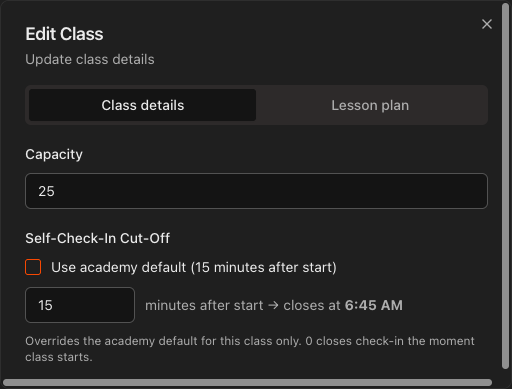
Abra Schedule, clique na aula e depois em Edit Class.
Em Self-Check-In Cut-Off, desmarque Use academy default.
Informe quantos minutos depois do início esta aula deve parar de aceitar check-ins.
O Kmura mostra o horário exato de fechamento enquanto você digita.
Dica
Use isso para aulas com um ritmo diferente, como um open mat em que chegar atrasado não tem problema.